Setup: OAuth / Open Id Connect in the AppServer
This article contains a summary of how technicians can log in to the app using a third-party identity system. There are many parallels to the third-party login via Windows authentication (e.g. known from Classic). In purely technical terms, the login process is standardized via OAuth 2.0 and Open Id Connect. OAuth 2.0 is a fairly abstract and extensible "framework" for coarse-grained application authorization (to be understood as "which application can access which API", e.g. my calendar application can access the events from the Google calendar via the Google API). Open Id Connect builds on this and adds some aspects regarding user identity and authentication. This article does not contain a complete technical introduction to OAuth 2.0 and Open Id Connect, but summarizes the technical basics that provide a basic understanding of the app's login process. The article explains the setup using Azure Active Directory; the setup is transferable to other systems such as Forgerock.
Overview
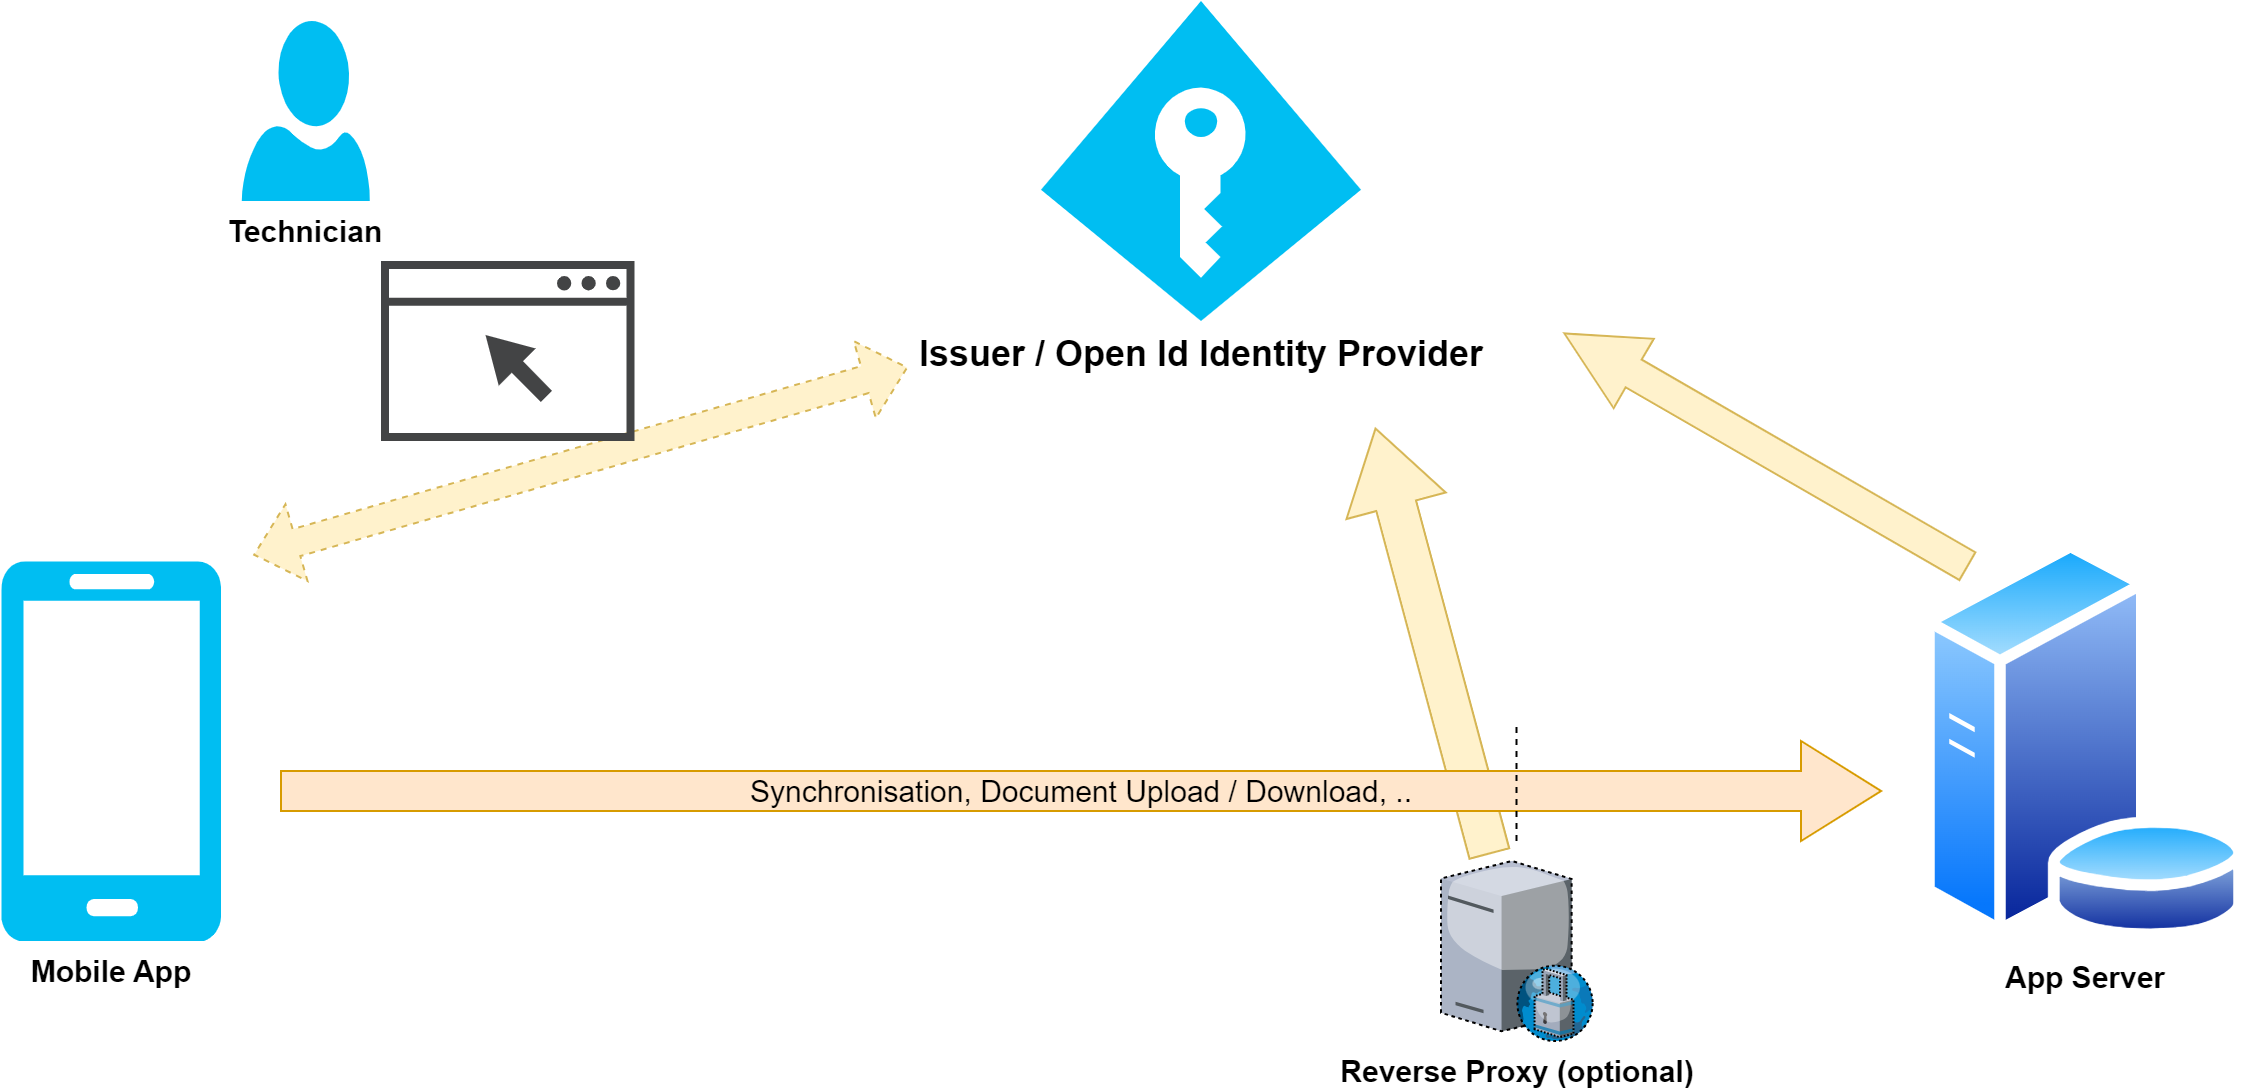
The following figure shows the components involved in the process. Yellow arrows represent Open Id communication channels. The orange arrow represents the standard communication between app and App Server, which also takes place without Open Id Connect (with the exception that authentication takes place via Open Id).
Issuer / Open Id Identity Provider
The Open Id Identity Provider is the external identity management system. The various applications are managed here and corresponding access authorizations are granted (e.g. Mobile App may access App Server). The component manages the users and provides standardized APIs through OAuth and Open Id to log in a user or an application. The Mobile App outsources the login process via the website of the Open Id Identity Provider and receives an access token (sometimes also referred to more abstractly as a security token) after successful login. The Mobile App uses this access token to access the App Server. The App Server and a potential intermediate reverse proxy must validate this access token using Open Id Connect and can, among other things, deduce the user and implement further security guidelines (more on this later). An example of an Open Id Identity Provider is Azure Active Directory. This component is sometimes also called Authorization Server. The term comes from OAuth 2, the article uses the term Open Id Provider in the following.
Mobile App
The Mobile App must authenticate the technician in order to gain access to the data exchange and other protected functionalities of the App Server. From an Open Id perspective, the Mobile App is a so-called "relying party". In almost all sources, the OAuth term "client" is used instead, which is why we also use the term "client" or just "app" below. A client is an application registered in the Open Id Provider that requires access to an API registered in the Open Id Provider (in our case, this is the App Server). OAuth distinguishes between public and confidential clients. The Mobile App falls into the public client category, which means that the Mobile App cannot securely store secrets and therefore does not have to additionally authenticate itself with the Open Id Provider (i.e. no application authentication in addition to user authentication). Confidential clients are usually found in the highly regulated server area (e.g. batch jobs between interfaces). Azure Active Directory uses the term application, i.e. to register and configure a public client, an application registration is created for the Mobile App.
App Server
The App Server provides the Mobile App with some functionalities regarding data exchange in the form of an Http-based interface. The App Server implements some authorization rules, e.g. that the accessing user can only exchange data with the app profile assigned to the user.
Reverse Proxy
We recommend additionally securing communication from the internet between the app and App Server with a reverse proxy. This can ensure for all Http requests from the internet that the request has a valid access token from the expected Open Id Provider. In principle, more far-reaching conditions are also possible, such as that the user must come from a specific user group of the technicians, etc. To check the access token, there is a dependency on the Open Id Provider. If you use Azure Active Directory, you can achieve this behavior using Azure API Management (see validate-azure-ad-token policy).
Procedure
The complete process from the first user login to accessing an App Server functionality goes through the following steps:
The technician clicks the login button within the app.
The technician is redirected from the app to the website of the Open Id Provider.
The technician authenticates himself there. The authentication method (password, 2-factor with OTP, ...) can be configured in the Open Id Provider and does not matter to the app. For the app, the website is a “black box”.
After successful authentication, the user is redirected back to the app.
The redirection contains data that the app uses to request an access token from the Open Id Provider, among other things.
The app uses the access token to access the App Server's APIs.
The App Server checks the access token and grants the requested functionality. For this purpose, the external user presented by the access token is mapped to an Innosoft user.
To log in via Open Id Connect, the following information is required within the Mobile App:
|
Characteristic |
Explanation |
|
Client Id |
The assigned Id of the Mobile App in the Open Id Provider. |
|
Open Id Provider Url |
The Open Id Provider is identified via the https-Url, under which the APIs of the Open Id Provider can be accessed. Below the route /.well-known/openid-configuration, the Open Id Provider provides further configuration data as a Json document. This value must also be included as an issuer claim in the tokens issued by the Open Id Provider. |
|
Redirect URI |
The Mobile App transfers the redirect URI of the Open Id Provider's login website as a query parameter. After login, the Open Id Provider uses this URI to redirect the flow back to the app. To do this, the server performs an Http 302 redirect to the specified redirect URI together with some return values within the query string. This redirect no longer takes place in the browser, but is intercepted by the Mobile App. Necessary information for the further process can be found in the query string of the redirect URI. The Mobile App registers some redirect URIs during installation so that the operating system opens these URIs via the app instead of within the browser. For this reason, the redirect URI is not freely configurable, but you can only choose from a limited predefined set in the App Server. |
|
(Api) Scope |
This scope is requested by the Mobile App during the login process. The scope corresponds to an access request to the App Server API. The issued access token can then be used to access the App Server APIs. In the App Server, you can define a requested scope that differs from the API scope and is requested by the Mobile App. This may be necessary because products such as Azure Active Directory use a type of namespacing when requesting scopes. For example, if you want to receive an access token for the App Server API "FullMobileAccess", the app must prefix the scope with the application ID of the App Server (e.g. api://<AppServerId>/FullMobileAccess). The issued token then contains the “FullMobileAccess” scope and is bound to the App Server via the audience claim. With other solutions, the requested scope can also correspond to the scope defined in the App Server. The app also requests the following additional Open Id standard scopes:
|
Phase 1: Interactive user login
The user is actively involved in this first phase of the registration process. The user is redirected to the website of the Open Id provider and must log in there, e.g. with a user name and password. In most cases, this step is only necessary once if the user is connecting to the app for the first time and has not yet logged in. The Mobile App can then skip this phase and automatically renew the user session in the background without the user being involved.
To do this, the Mobile App reads the so-called "authorization_endpoint" from the wellknown document of the Open Id Provider. The "authorization_endpoint" corresponds to the URL of the Open Id Provider's login page. In addition, the app appends the following parameters to the "authorization_endpoint" as query parameters. The assembled URL is then loaded in a webview and the website is displayed to the user for login.
|
Query parameter |
Description |
|
client_id |
Client Id assigned to the Mobile App |
|
redirect_uri |
Redirect URI to which the Open Id Provider redirects after login or in the event of an error in order to transfer the flow back to the app. |
|
scope |
Space-concatenated enumeration of the requested scopes (openid, offline_access and <api scope>). Please note that spaces in URLs are encoded as %20 using percent encoding. |
|
response_type |
Always "code". Indicates the use of the authorization code flow. Necessary because many Open Id providers implement and offer different flows at the same time. |
|
state |
String generated by the app and returned by the Open Id provider within the redirect URI. Cryptographic random string to prevent phishing attacks on the redirect URI. |
|
code_challenge |
Part of the PKCI extension. The app generates a sufficiently long random character string, the so-called code_verifier. The encoded Sha-256 hash of this string is the code_challenge. |
|
code_challenge_method |
Always "S256". Indicates that the challenge was calculated using the hash function “SHA-256”. |

As soon as the login has been completed, the Open Id Provider generates an Http redirect to the transferred redirect URI. The Open Id Provider adds the necessary information for further processing as a query string appended to the redirect URI. The Redirect URI is opened by the app. This closes the website and the Open Id logic in the app completes the login process. If successful, the Open Id provider sends the following parameters back to the app via the query string of the redirect URI:
|
Query parameter |
Description |
|
code |
Short-lived character string from the Open Id Provider that the app subsequently uses to request the tokens from the Open Id Provider. The code is bound to the code_challenge contained in the request. |
|
state |
Unchanged character string of the parameter of the same name from the request. The redirect URI is discarded if no request was previously made from the app with this state parameter or if the redirect URI with the state parameter has already been processed. |
Phase 2: Token exchange
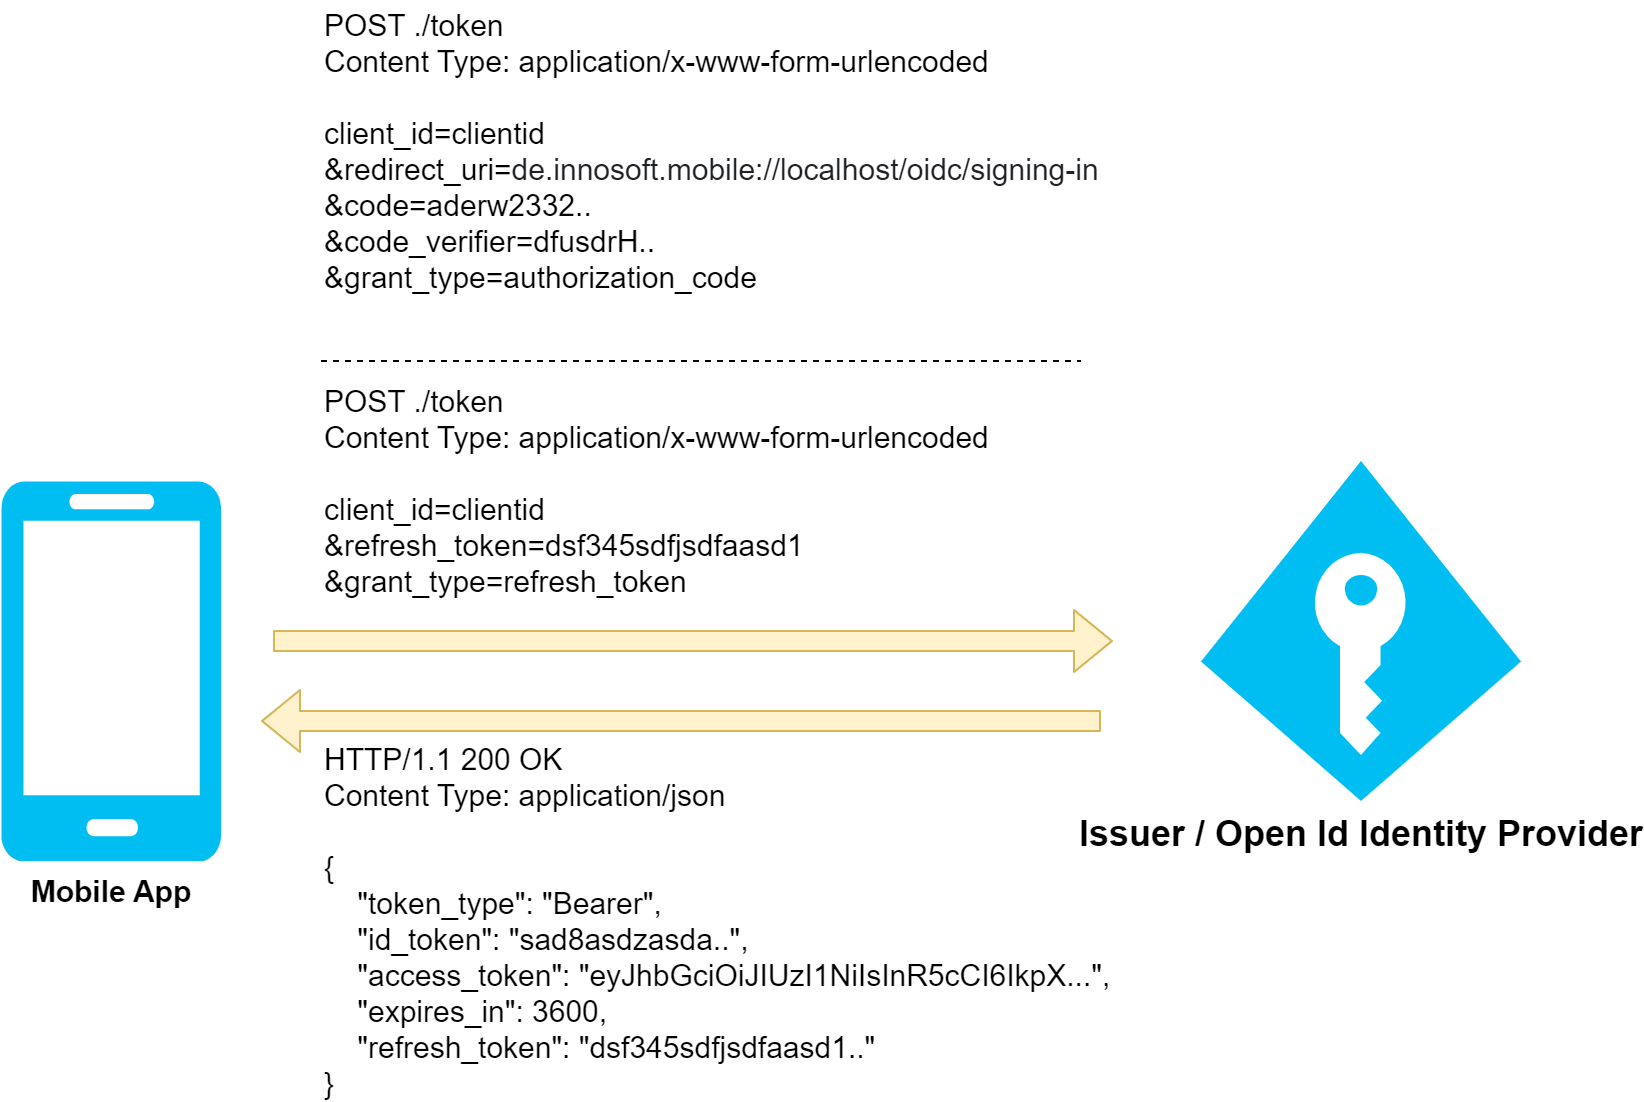
In the 2nd phase, the app programmatically requests the tokens from the Open Id Provider via Http (i.e. the communication is invisible to the user; the browser is no longer involved). Like the "authorization_endpoint", the corresponding "token_endpoint" is defined via the wellknown document "/.well-known/openid-configuration". The token endpoint is used on the one hand to complete the login and on the other to renew the session. In the former case, the code received in the first phase is used; in the latter case, a special token previously received by the app is used (refresh token). In both cases, the app calls the URL defined under "token_endpoint" with an Http POST. The code or the refresh token is transmitted encoded as form data in the request body to the Open Id Provider, which responds with a Json document containing the issued tokens if successful.
|
Token type |
Description |
|
id_token |
The Id token is a Json document (JWT) signed by the Open Id Provider. The token contains information about the authentication and some basic information about the user, such as a unique ID and name. The token is only issued for the requesting application (Mobile App). The Mobile App validates the token but does not use it, as the user data is taken from the Innosoft database. |
|
access_token |
The access token is also a Json document (JWT) signed by the Open Id Provider. It contains some information about the user as well as the successfully granted access authorizations (scopes). The Mobile App uses the access token to access the App Server APIs. The App Server in turn validates the access token, including checking the signature and the access authorizations granted, and then grants access to the requested functionality. "expires_in" indicates how many seconds the access token is valid. If the access token has expired, the app discards the access token and uses the "refresh_token" to request a fresh access token with a new validity period. |
|
refresh_token |
The refresh token is used by the app to request a new access token as soon as the previous access token has expired. The token endpoint issues new tokens when it is called with a valid refresh token. The app can therefore skip the 1st interactive phase and the user is not inconvenienced. Instead of a long-lived access token, there is a short-lived access token (usually a few minutes to an hour lifetime) and a long-lived refresh token to renew the short-lived access token. The difference is that, unlike the refresh token, once issued, the access token remains valid for its entire lifetime (it is a signed json structure with a runtime). The refresh token, on the other hand, can become invalid, e.g. if the user logs out of all sessions because he has lost his cell phone. In this case, the token endpoint fails when called with the refresh token and the user must log in again interactively (1st phase). |
Functionality of PKCI
The problem in the original code flow without PKCI is as follows:
The user starts the login from the trusted application.
The user logs into the Open Id Provider.
The Open Id Provider redirects to the redirect URI. However, this redirect URI is intercepted by a third-party application.
The third-party application uses the code within the redirect URI to subsequently request an access token. The third-party application can use this access token to access the external, protected API.
The cause of this problematic gap is that the Open Id Provider cannot use the code alone to check whether the requesting application is the same application that initiated the login process when exchanging tokens. The two requests "authorization_endpoint" and "token_endpoint" should therefore be cryptographically linked.
For this purpose, the requesting app generates a sufficiently long random string. This string is hashed via SHA-256, a sufficiently strong one-way function (i.e. an attacker cannot calculate the original value for the transmitted hash value within the possible, very short attack time). The requesting app remembers the random string as a code_verifier and transmits the hash as a code_challenge within the "authorization_endpoint" web page call. If the Open Id Provider issues a "code" after a successful user login, it also internally links the code_challenge with the issued "code". The "code" can then only be redeemed in conjunction with the "code_verifier" via the "token_endpoint". For this purpose, the requesting application includes the "code_verifier" as a query parameter in addition to the "code" parameter. The identity provider calculates the Sha-256 hash of the "code_verifier". If this does not match the "code_challenge" stored for the "code", the Open Id Provider rejects the token request. The use of a one-way function has the additional advantage that the actual "secret" is not transmitted in the browser via the "authorization_endpoint". This provides a further protective mechanism in case the code_challenge is leaked in "insecure" browsers.
3. Using the access token and calling the App Server APIs
The user of the Mobile App must authenticate himself when accessing the standard App Server functionalities (e.g. data exchange). To do this, the app adds the previously received access token to the Http requests in the form of the authorization header. The App Server reads this header and first validates the access token. To verify the signature, the Open Id Provider publishes the public keys it uses in the form of a publicly accessible Json document. The URL of the document is defined in the wellknown document under "jwks_uri". The claims of a user are encoded in the Access Token within a Json object in the form of a generic Key-Value (Claim Type - Claim Value) object. For example, Open Id defines the subject identifier claim "sub". The Json object contains the standard user ID under the key "sub". JWT can display this website https://jwt.io/ in a user-friendly way.
In addition to verifying the signature, the App Server checks in particular:
Whether the access token has been issued for the App Server (audience claim).
Whether the defined "FullMobileAccess" scope is included (i.e. has been granted). The name of the scope is configurable. We recommend retaining the default value FullMobileAccess.
Whether the access token is valid (expiration claim > utc now).
Whether the access token was issued by the defined issuer (issuer claim). This is also done indirectly via signature validation.
The App Server must then transfer the external user to an internal Innosoft user. To do this, the App Server maps the external user using a configurable claim, e.g. the subject identifier "sub" claim. The claim is extracted from the access token and the App Server uses the value to search for the corresponding Innosoft PwUser. The corresponding column in PwUser is configurable. The functionality is based on Windows authentication with the PwUser.WinUser column. The App Server does not maintain the mapping. This is done either in the customer interface or for individual users in the FSM via the OAuth linking functionality. Alternatively, the App Server can reuse the user mapping from the FSM. In this case, the mapping is stored in a separate table (PwExternalLogin table).
Define a unique index to ensure the uniqueness of the external user IDs. Assuming you are using PwUser.ExternalUserId as the column, you can create a unique index as follows:
CREATE UNIQUE INDEX IDX_PWUSER_EXTERNALUSERID_UNIQUE ON PWUSER(EXTERNALUSERID) WHERE EXTERNALUSERID IS NOT NULL;
The App Server uses the mapped Innosoft user for the further calculation logic. If no user can be clearly mapped, the App Server rejects the request.
Which claim should be used to map the user?
In general, it is up to the project team to decide how a user should be mapped, as the values are maintained via a customer interface. Below are some hints that may be useful when making a decision. By default, the subject identifier "sub" is a suitable candidate. The Open Id Provider defines this as a unique user ID. However, it should be noted that there are two types of subject identifiers: Public and pairwise. With public subject identifiers, the same user is identified across all applications via a unique ID. With pairwise subject identifiers, each application receives a different ID for the same user. This means that separate mappings must be maintained for the FSM and the Mobile App, for example. In addition, the subject identifier also changes for the same application if the redirect URI is adjusted. The use of the subject identifier should therefore be avoided if the identity provider assigns a pairwise subject identifier. This is the case with Azure Active Directory, for example. In this case, you should consult the documentation of the identity provider. Azure Active Directory defines the "oid" claim, which is the unique Guid of the user in the directory.
Good candidates are usually properties that contain unchangeable, random values. For example, using the user's e-mail address is not ideal, as the e-mail address does not guarantee that it cannot be assigned to another user in the future. The user can also change his e-mail address, which changes the ID. Here, the disadvantages should be weighed against the implementation effort in the interface.
Configuration using the example of Azure Active Directory
This article contains a step-by-step explanation of how to connect the Mobile App and the App Server to an Azure Active Directory. The example can be helpful when connecting another identity provider. We assume that in this example scenario the Innosoft users are mapped to the Guid of the Azure Active Directory users (oid claim) via the PwUser.ExternalUserId column.
The following steps are necessary for configuration:
Add application registration for the App Server in the Azure Active Directory via the Azure Portal
Define the "FullMobileAccess" API/scope in the App Server's application registration
Add application registration for the Mobile App in the Azure Active Directory via the Azure Portal
Grant access to the App Server's FullMobileAccess API in the Mobile App's application registration
Create the identity provider in the App Server admin interface and copy the corresponding values from the application registrations
In the Azure Portal, navigate to the "App registrations" menu item in the corresponding Azure Active Directory client and create a new application registration for the App Server using the "New registration" action. You can enter "Innosoft Mobile App Server" for the name, select "Accounts in this organizational directory only" for the menu item "Support account types" and leave the optional redirect URI empty.

After creating the application registration by clicking on "Register", navigate to "Overview" in the application registration and make a note of the application (client) ID. Then navigate to "Manage / Expose an API". Now click on "Add a scope". If no application ID URI has been assigned yet, confirm the proposed value with "Save and continue". Enter "FullMobileAccess" as the "Scope name". For the two mandatory fields "Admin consent display name" and "Admin consent description", enter a short description for your Azure admins, e.g. "Innosoft Mobile Data Exchange" and "Standard functionality to exchange data between back office and mobile devices". Leave the default values for the rest. Make a note of the following values before you create the scope with "Add scope": the "Scope name" and the API scope displayed below it (the previously assigned application ID URI is prefixed to the scope name; in the image api://901ec523-9acb-48c2-b7e4-ea5e273fd58b/FullMobileAccess).

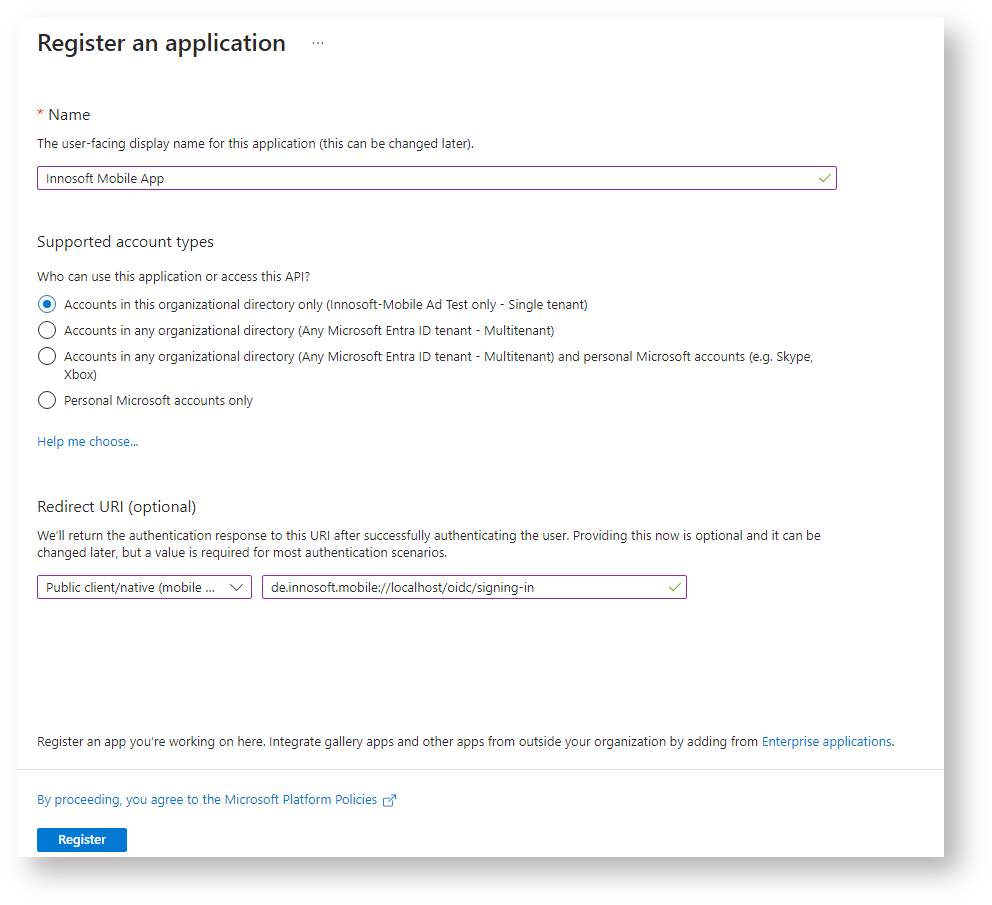
Open the application registrations in a 2nd tab and create another application registration for the Mobile App via "Register". You can assign "Innosoft Mobile App" as the name, for the menu item "Support account types" select "Accounts in this organizational directory only" and assign the optional redirect URI as follows: select "Public client / native (mobile & desktop)" in the selection list in front and enter "de.innosoft.mobile://localhost/oidc/signing-in" in the input field for the redirect URI (the value must be exactly right, otherwise the redirection from the browser back to the Mobile App on the cell phone will not work).
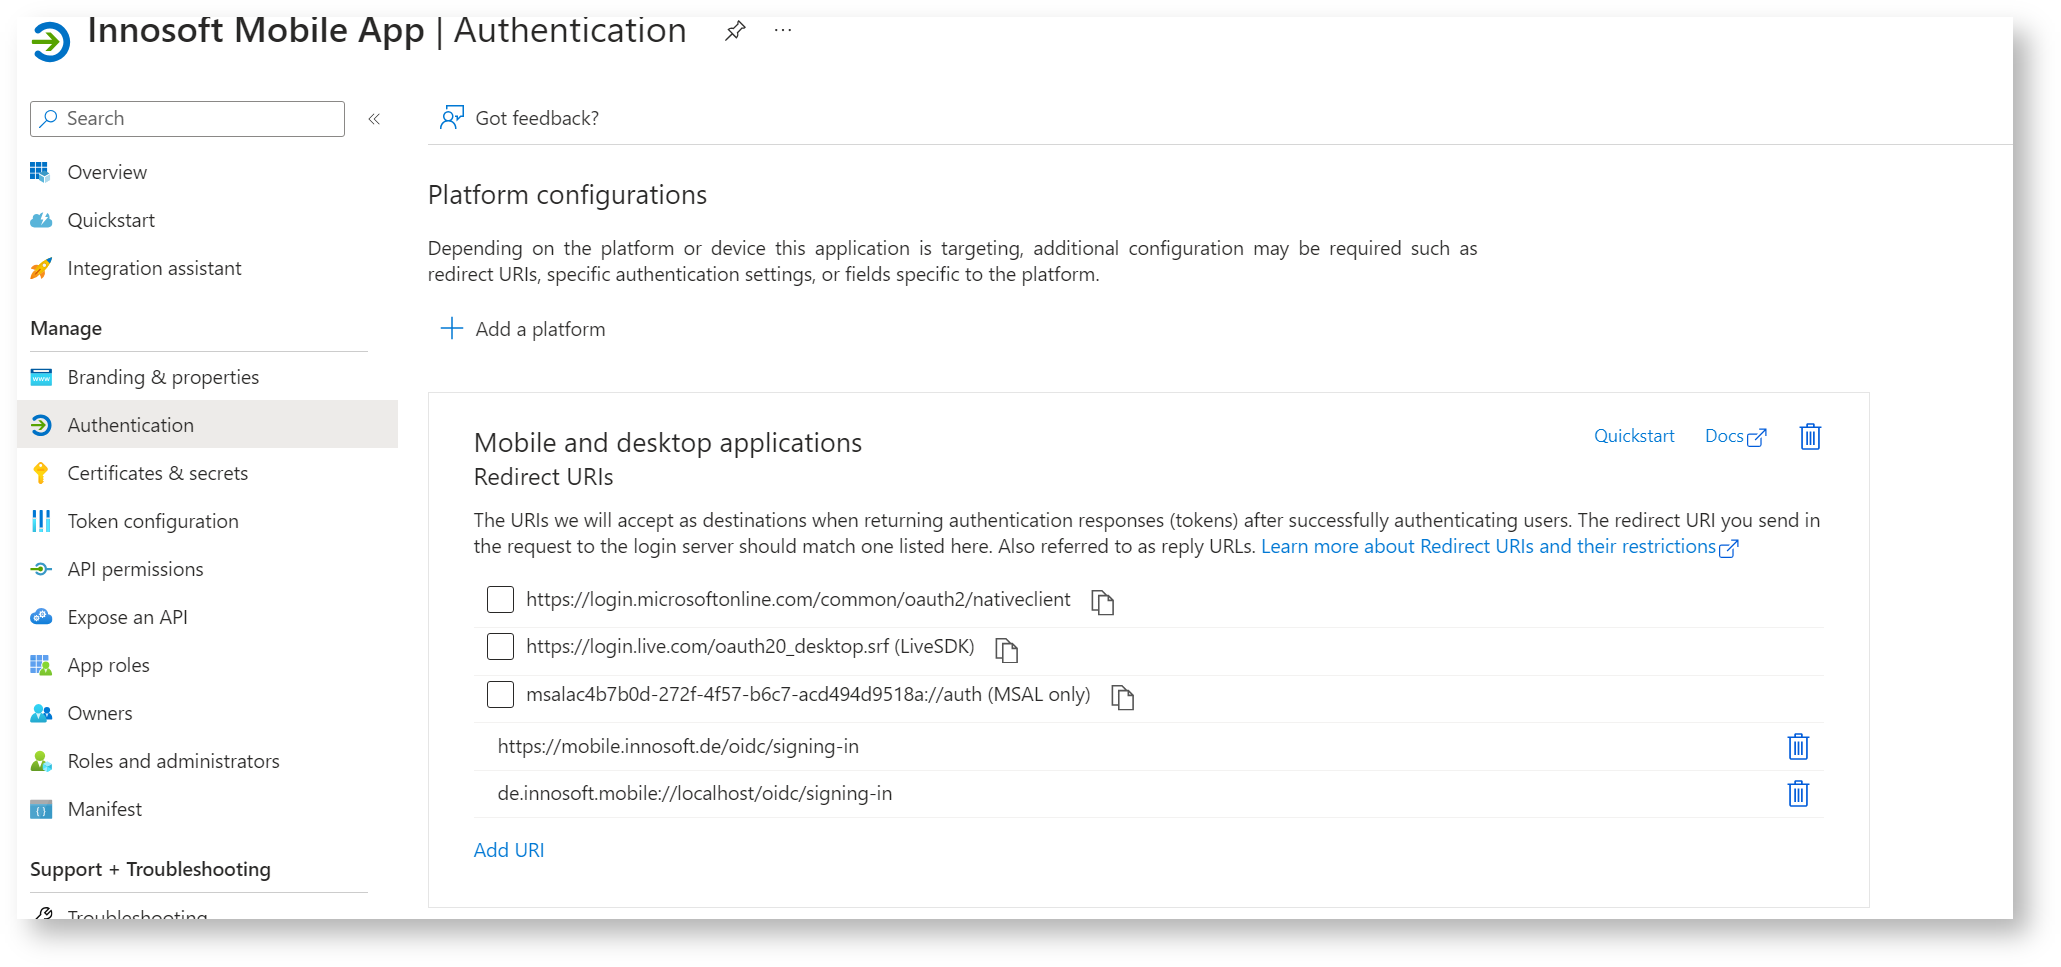
After creating the application registration by clicking on "Register", navigate to "Overview" in the application registration. Make a note of the application (client) ID. If you also want to connect Windows devices, you must add another redirect URI. To do this, click on "Manage / Authentication" and add the redirect URI "https://mobile.innosoft.de/oidc/signing-in" to the existing redirect URIs. Then click on "Save".
Then click on "Endpoints". In a separate tab, open the URL defined under "OpenID Connect metadata document" (this URL ends with ".well-known/openid-configuration"). Make sure that the "Issuer" property in the Json document corresponds to the URL called up without ".well-known/openid-configuration", e.g. the "issuer" at the endpoint https://login.microsoftonline.com/1ebd4a20-0588-42f5-a339-125a4df32b5a/v2.0/.well-known/openid-configuration must correspond to "https://login.microsoftonline.com/1ebd4a20-0588-42f5-a339-125a4df32b5a/v2.0". Make a note of the value of "issuer" without ", e.g. https://login.microsoftonline.com/1ebd4a20-0588-42f5-a339-125a4df32b5a/v2.0 .

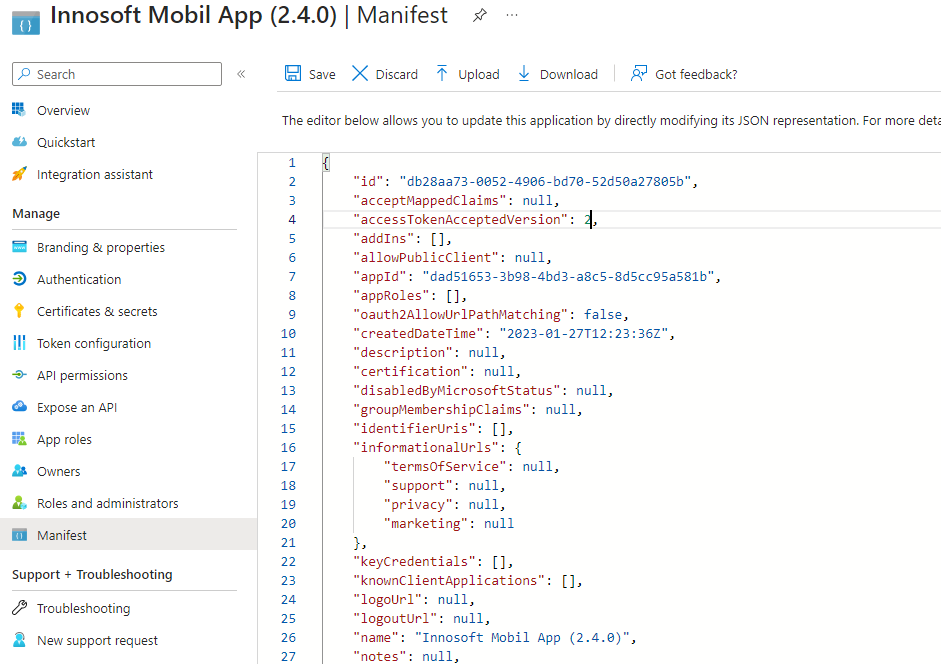
If the Issuer is not set as described above, navigate to "Manage / Manifest" in the Innosoft Mobile App application registration. Change the key value from "accessTokenAcceptedVersion" to 2.
Then save and load the previous ".well-known/openid-configuration" endpoint until the issuer corresponds to the desired value. It may take up to a minute for the change to be visible.
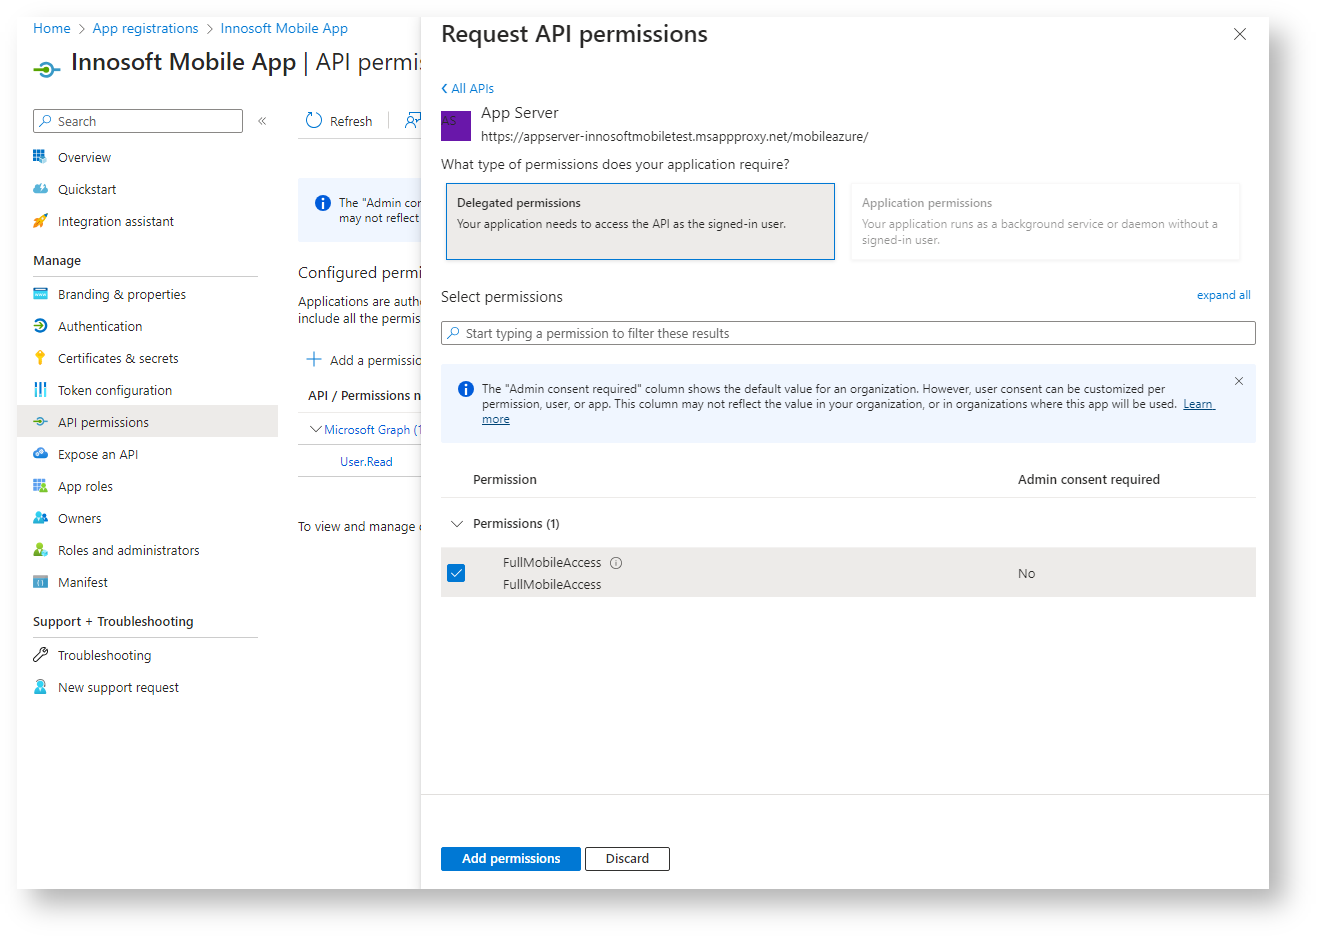
Now grant the Innosoft Mobile App access authorization to the previously created App Server API. To do this, navigate to "Manage / API permissions" in the application registry. Leave the existing API permission for "Microsoft Graph" (User.Read) untouched. Add an access permission for the previously created App Server API "FullMobileAccess". To do this, click on "Add a permission". In the "APIs my organization uses" tab, search for the previously created Innosoft Mobile App Server registration. In the following dialog, first click on "Delegated permissions" and then tick the "FullMobileAccess" permission. Create the permission with "Add permission".
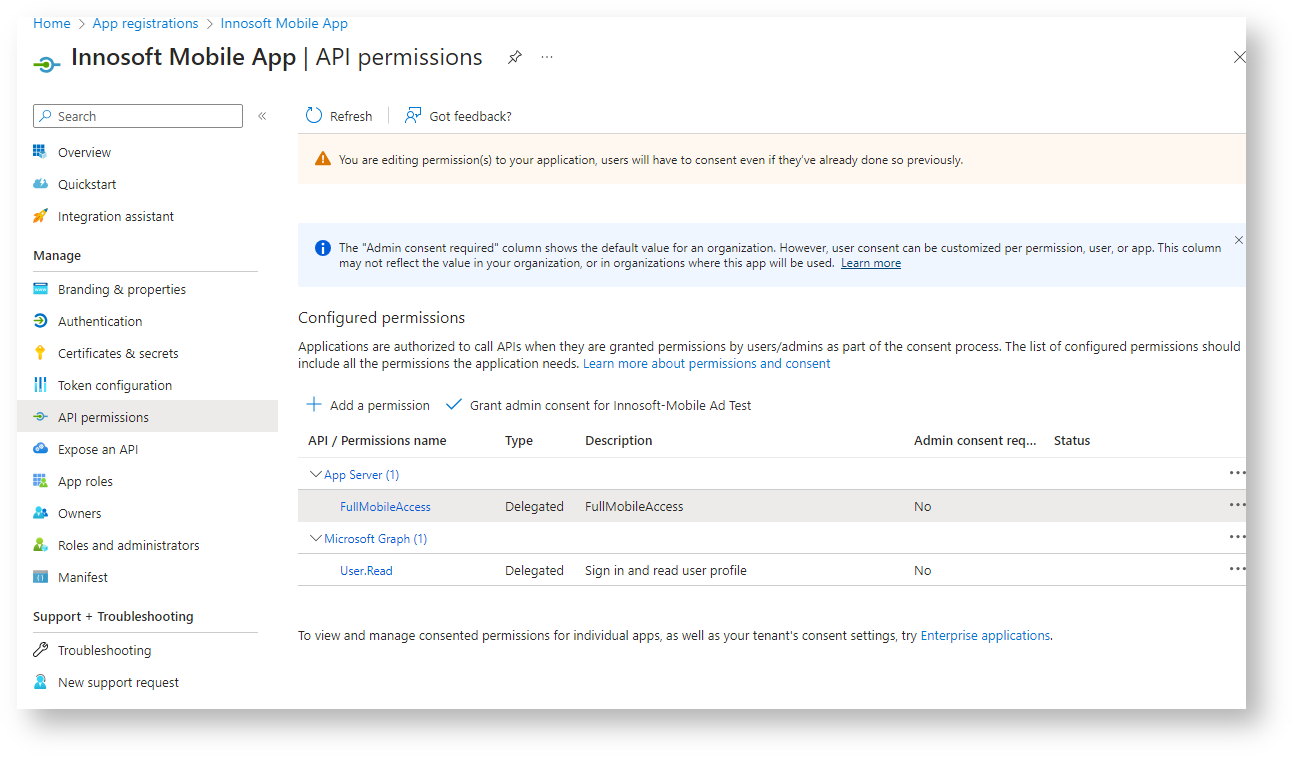
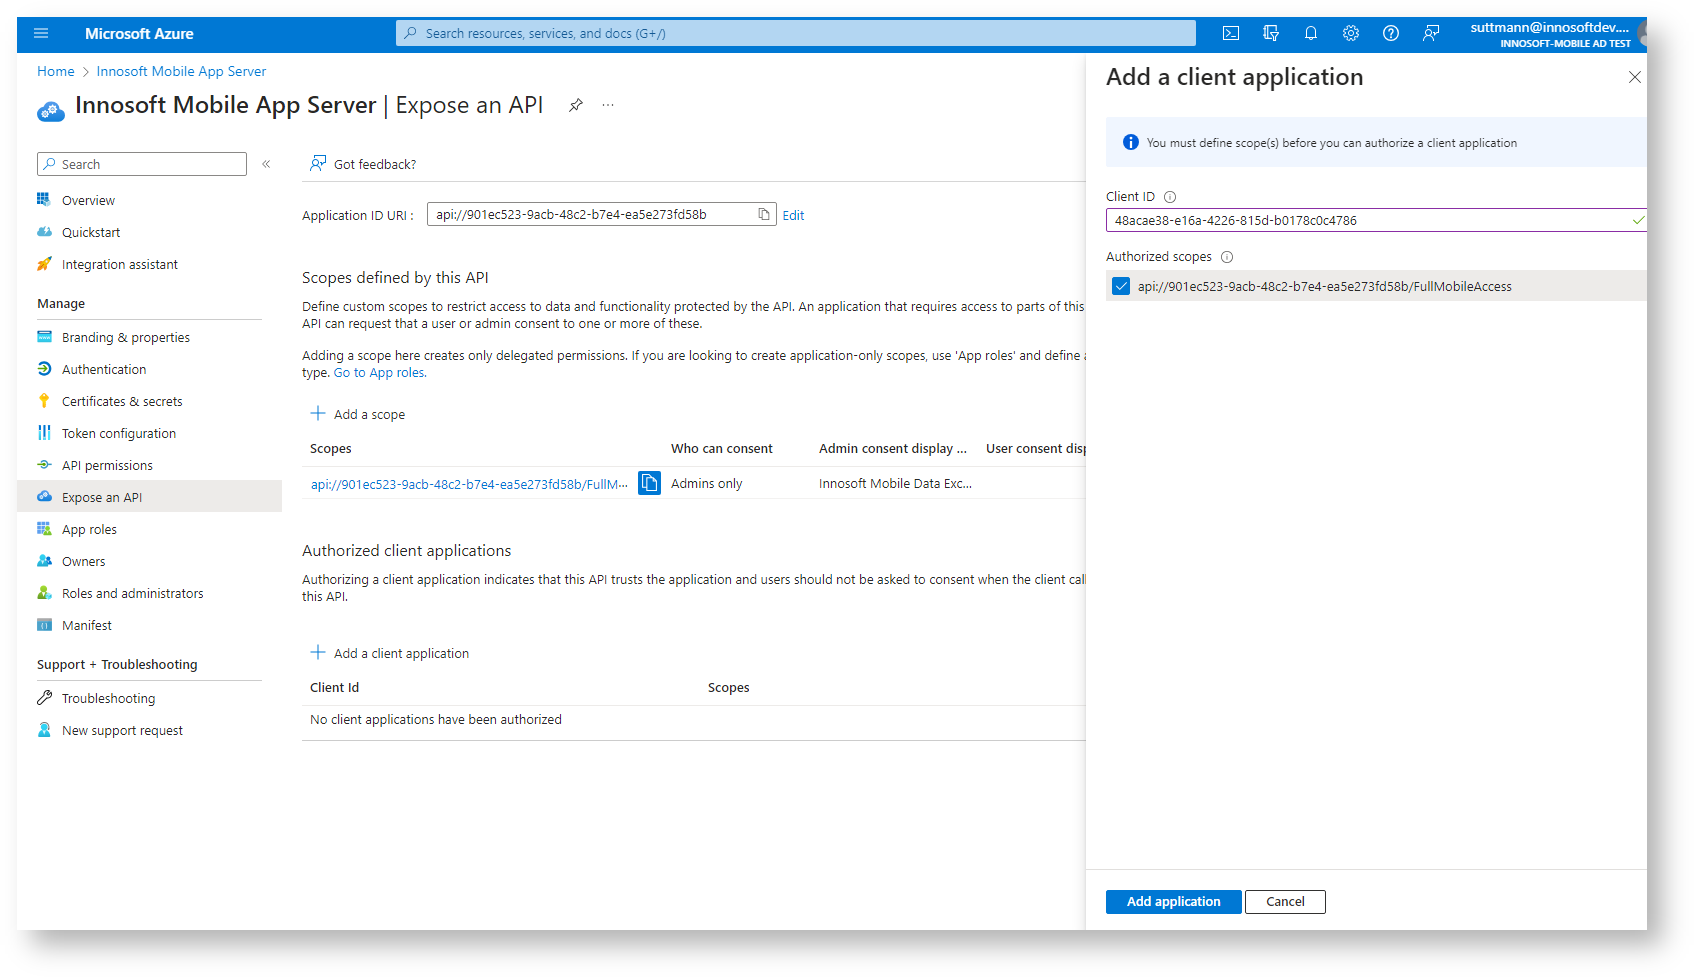
So that the user does not receive a confusing authorization message after logging in (in the form "The Innosoft Mobile App would like to access your Innosoft Mobile App Server. Do you grant this access?"), you can either grant admin consent with "Grant admin consent for <tenant name>" or generally grant the API permission from the App Server for the Mobile App. For the latter, open the tab with the open application registration of the Innosoft Mobile App Server. Under "Manage / Expose an API", create a release for the Innosoft Mobile App under "Authorized client applications" with "Add a client application". Copy the previously noted application (client) ID of the Innosoft Mobile App into the "Client ID" field and tick the FullMobileAccess Scope under "Authorized scopes". Then confirm the release via "Add application".
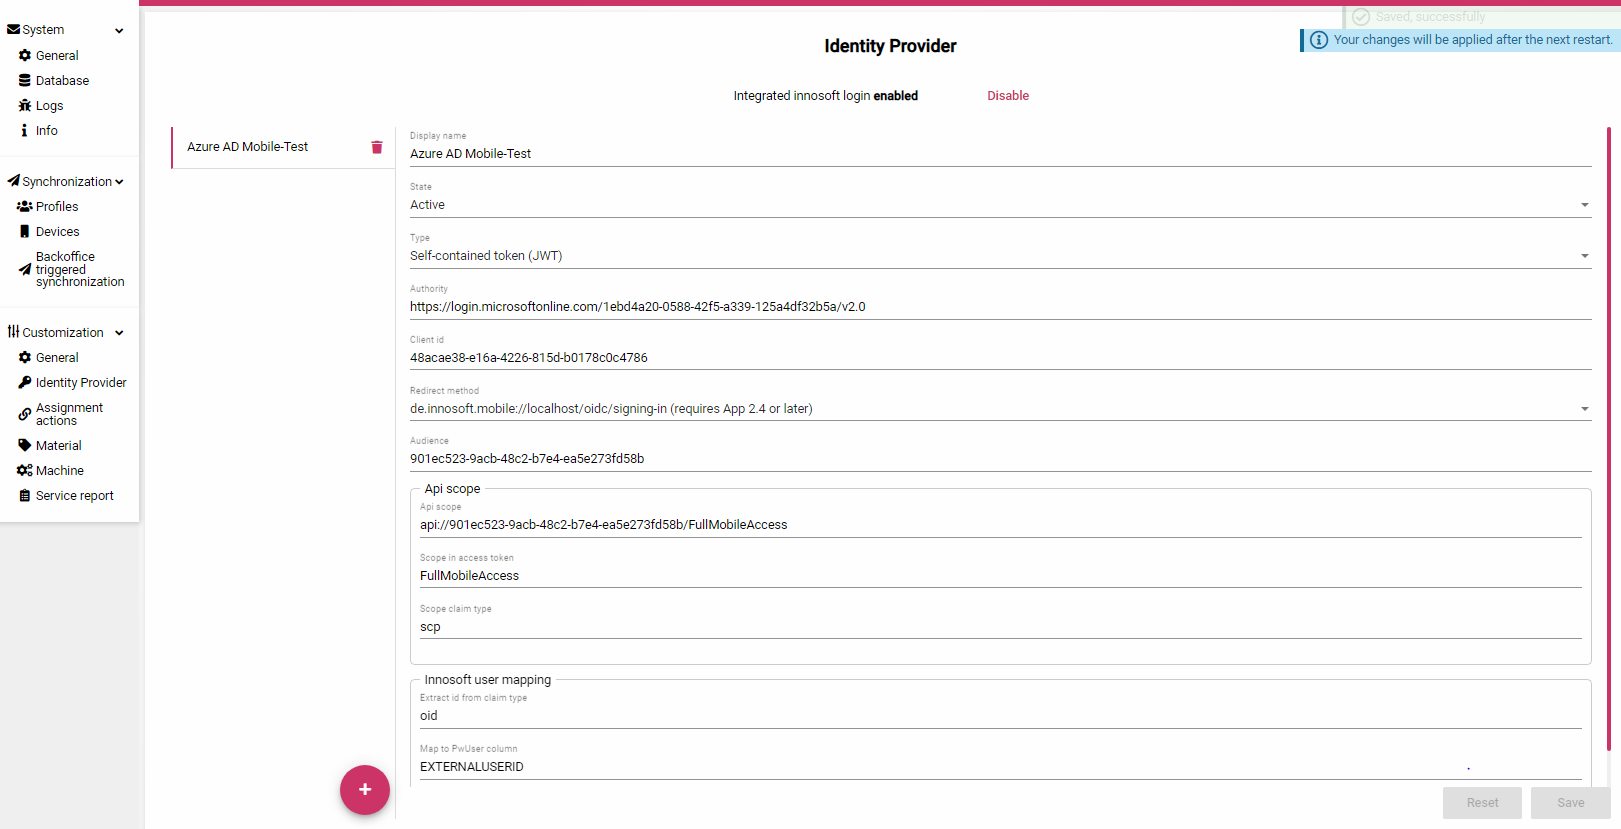
The configuration in the Azure Portal is completed. Now open the admin interface of the App Server to store the noted values. Navigate to "Customization / Identity Provider". Create a new entry with the "+" button. The fields in the form are filled as follows:
If the FSM is connected to the same tenant, the app can reuse the user mapping from the FSM. Adjust the values in the "Innosoft user mapping section" accordingly:
Extract id from claim type: "preferred_username"
Mapped by: "PwExternalLogin provider"
Map to PwExternalLogin.ExternalId by provider key: "OAuth"
|
Field |
Value |
|
Display name |
Short name. This name is displayed to the technician in the Mobile App before logging in. |
|
State |
Active. The configuration is active. |
|
Type |
Self-contained token (JWT) |
|
Authority |
The URL that you have noted for the "issuer" property. |
|
Client |
The noted Application (client) ID of the Innosoft Mobile App Application registration |
|
Audience |
The noted application (client) ID of the Innosoft Mobile App Server application registration |
|
Redirect method |
Select "de.innosoft.mobile://localhost/oidc/signing-in (requires App 2.4 or later)" for iOS and Android. If you also want to connect Windows devices, click on "Add Platform" to add a redirect method for Windows. The redirect URI is currently set to "https://mobile.innosoft.de/oidc/signing-in" on Windows. |
|
Api scope |
The noted API Scope "api://.../FullMobileAccess" |
|
Scope in access token |
The noted Scope name "FullMobileAccess" |
|
Scope claim type |
scp |
|
Extract id from claim type |
oid (as described above, we map from oid to PwUser.EXTERNALUSERID) |
|
Map to PwUser column |
EXTERNALUSERID |
In addition, you can deactivate the built-in login mechanism via the Innosoft logins by clicking on "Disable" next to "Integrated innosoft login". Then click on "Save" to create the entry. You must restart the App Server once to activate the changes. If you set up a user with a QR code, the registered Open Id provider ("Azure AD Mobile-Test" in the image) is suggested as a selection.
Technical summary
This section briefly summarizes the technical requirements. This allows you to check whether an identity provider is compatible and what configuration is required. This is only a rough overview:
|
Mobile App |
|
|
Client Typ |
Public Client |
|
Supported flow |
Code Flow with PKCI |
|
Requested scopes |
|
|
Redirect URIs |
Possible redirect URIs:
For best compatibility on cell phones, use de.innosoft.mobile:/oidc/signing-in or de.innosoft.mobile://localhost/oidc/signing-in (if the identity provider requires an authority share). The app for Windows currently only supports the https redirect URI. You can define different URIs per platform. |
|
Other requirements |
|
|
App Server |
|
|
Client Typ |
Confidential Client when using Reference Token (for Introspection API via Basic Authentication), not applicable otherwise |
|
Supported access tokens |
|
|
Expected claims in the access token |
|
|
Other requirements |
|