Installing and Updating Innosoft Web Applications
This article contains explanations on how to install and update Innosoft web applications used by the Mobile App and the Innosoft Rest-Api. It does not cover the installation of Innosoft Field Service Management (FSM).
Checking the requirements
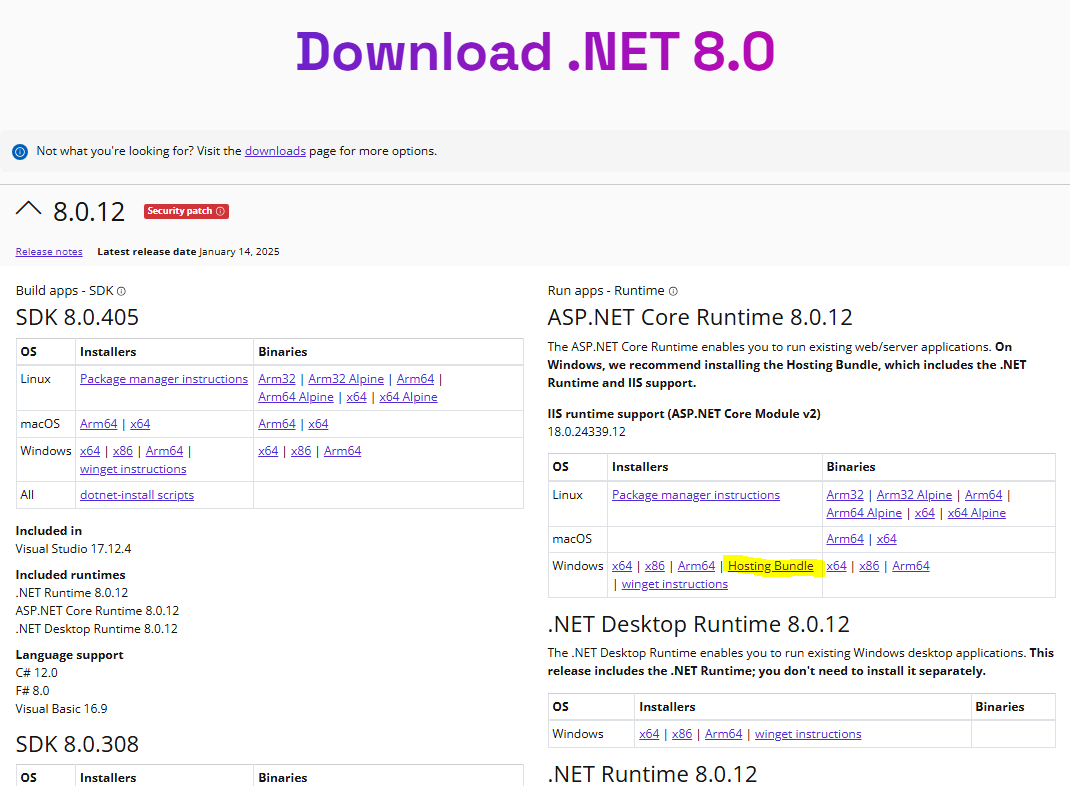
First install the IIS web server before you install the ASP.NET Core Runtime hosting bundle. Otherwise the installer will not be able to install the IIS module AspNetCoreModuleV2 and you will have to repair the hosting bundle after installing the IIS.
The download area documents the requirements for the release, such as the minimum supported Sql server version. Pay particular attention to the required Dotnet Runtime version. The modern Dotnet allows the installation of different versions on the same machine in contrast to the classic .Net Framework, which is updated centrally via the Windows Update Center. We strongly recommend installing the corresponding Dotnet Runtime via the ASP.NET Core Runtime hosting bundle. A compatible version of the Hosting Bundle is linked in our Confluence download area. In addition to the standard runtime, the hosting bundle contains the following additional components required for web applications:
The ASP.NET Core Runtime (contains pre-compiled .dlls of the Dotnet web framework, which are necessary for the execution of Dotnet web applications, such as AppServer)
The IIS module AspNetCoreModuleV2, which integrates modern Dotnet web applications into the IIS
If you do not wish to use the linked hosting bundle, you can find the hosting bundle on the Dotnet download page.
Output of the installed .NET runtimes
If you have already installed a Dotnet Runtime, you can use the following commands to output the installed Runtime versions.
dotnet --list-runtimes
The release in the download area documents the required runtime version. If, for example, the web server requires a Dotnet 8 runtime, the command should output at least the following versions:
Microsoft.NETCore.App 8... (Standard Dotnet Runtime in version 8..)
Microsoft.AspNetCore.App 8... (Contains pre-compiled .dlls of the Dotnet web framework, which are necessary for the execution of Dotnet web applications, such as AppServer)
Output of the required .NET runtimes
The following Powershell command outputs the required .NET runtimes if you execute it in the main application directory (unpacked zip).
Get-ChildItem -Filter *runtimeconfig.json | Get-Content | ConvertFrom-Json | % { $_.runtimeOptions.frameworks }
Setting up the web application
This article describes how to configure and deploy the Innsoft web application via the Microsoft Internet Information Services (IIS) web server.
Folder structure
Before you open the Internet Information Services (IIS) Manager, you should create the folder structure using the file explorer and unpack the application zip package into the folder structure. Depending on your requirements, two structures are possible:
Sub-applications: Several web applications, such as App Server, FSM, Rest-Api should be accessible via the same port, e.g. via the https standard port 443 (recommended)
One application per port. Each application must be accessible via a separate port (not recommended)
We recommend the variant with the sub-applications, even if you only want to install one web application in the first step. For this, we recommend creating a hierarchical folder structure in the form: <Base path>/<Site name>/<Application name>. For the <Application Name> folder, choose a short name with only letters without special characters, as this is part of the URL via which the web application will be accessible (application path), e.g. mobile for the app server of the Innosoft Mobile application. Then unpack the application zip package into the created path.
With the one "application per port" variant, you can unpack the application zip package into any directory.
Assign file permissions
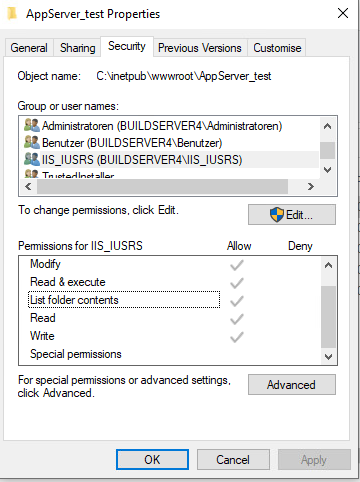
Set the following file permissions on the application folder and all subfolders:
Modify
Read & Execute
List content folders
Read
Write
We recommend the use of a dedicated service account. In the section "Configuring the Internet Information Services (IIS) / Creating an application pool", you can find out how to set the account that runs the application. If you are using the standard built-in IIS account, set the file rights via the local group "IIS_IUSRS" (not recommended). Otherwise, set the rights for the service account. When adding the file permissions, make sure that the file permissions are also set for all sub-objects.
Configuration of Internet Information Services (IIS)
The provision of the web application via the IIS requires the following steps in the Internet Information Services (IIS) Manager:
Creation and configuration of an application pool in which the web application is executed
Creation of an IIS site, which mainly defines the port via which the web application can be accessed
Creation of an IIS (sub-) application
You must first import the SSL web server certificate together with the entire chain of trust into the Windows certificate store (only necessary for operation via https).
Import SSL web server certificate
The use of https is recommended. A valid exception for the configuration without encryption (http) is TLS termination in a reverse proxy, which is connected upstream of the IIS web application. In this case, the client establishes a secure https connection with the reverse proxy, which forwards the http request unencrypted in the private network to the IIS web application.
For the correct configuration of the IIS web server with an SSL web server certificate, the entire chain of trust must be available in the machine's certificate store. You can import the entire chain of trust in a single step by transferring the chain to the .pfx container format. The container contains the following:
Certificate of the root certification authority
Certificate(s) of the intermediate certification authorities
Certificates of the web server
Private key of the web server
The file is usually password-protected as it contains the private key of the web server.
Create .pfx containers from individual certificates
If you have the individual certificates and the private key of the web server in a single file (.crt or .pem for the certificates), you can use openssl to create a .pfx container file with all the necessary certificates and the private key.
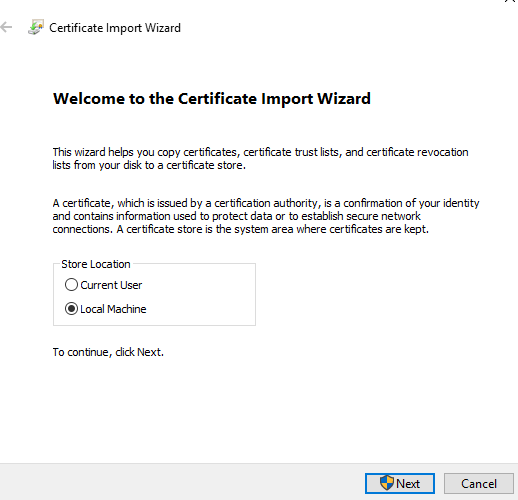
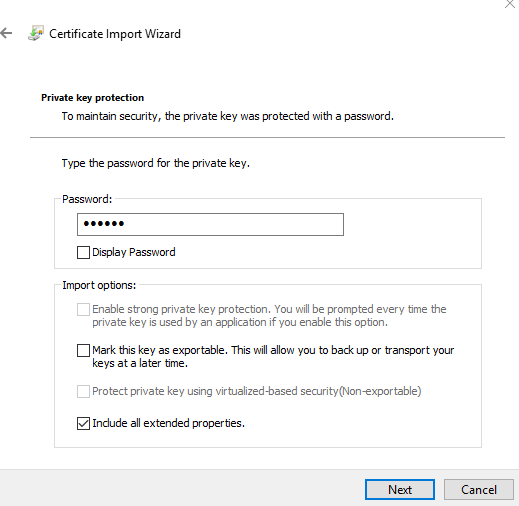
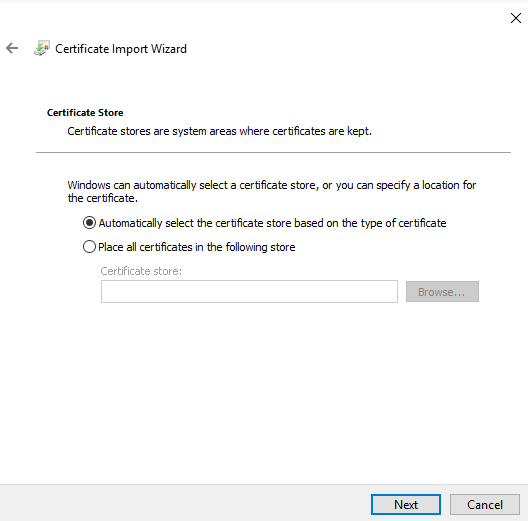
# example:# inputs: webserver.key: private key, root-ca.crt root ca, intermediate-ca.crt intermediate ca (you can add additional intermediate cas as arguments for the cat command)# gotcha: openssl doesn't support multiple -certfile options (it will use the last option in case of multiple options). therefor we concat all cas into a single pem-file# and pass this bundled list as a single -certfile option# open ssl asks for a export key: this key is used to protect the private key inside the resulting .pfx-container# use a secure password. you need to enter this password when you import the .pfx container into the windows certificate storage later# output: webserver.pfx including private key and certificates of root + intermediate ca + webserver ssl certificatecat root-ca.crt intermediate-ca.crt > ca-bundle.pemopenssl pkcs12 -inkey webserver.key -in webserver.crt -certfile ca-bundle.pem -export -out webserver.pfxTo import the certificates including the private key of the web server into the Windows certificate store, right-click on the .pfx file and select the "Install PFX" action in the context menu. In the "Certificate Import Wizard" that appears, select "Local Machine" as the "Store Location" on the first page. The file path to the .pfx file is preset on the following page. Skip this page without making any changes by clicking on "Next". Then enter the password with which the .pfx file is protected. In the "Import options" check the option "Include all extended properties" (should already be preselected). Continue to the next page by clicking on "Next". There, select the option "Automatically select the certificate store based on the type of certificate". Confirm by clicking on "Next" and complete the import by clicking on "Finish".
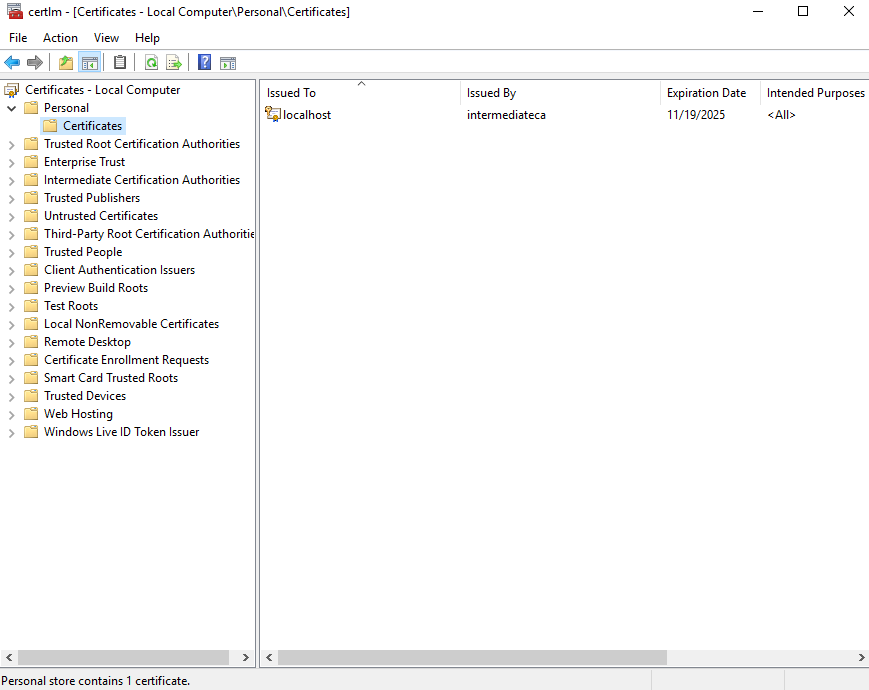
You can then check the certificates of the local computer in the "certlm.msc" administration interface. If the import process was successful, you will find the necessary certificates in the following folders:
In the folder Personal / Certificates you will find the web server certificate.
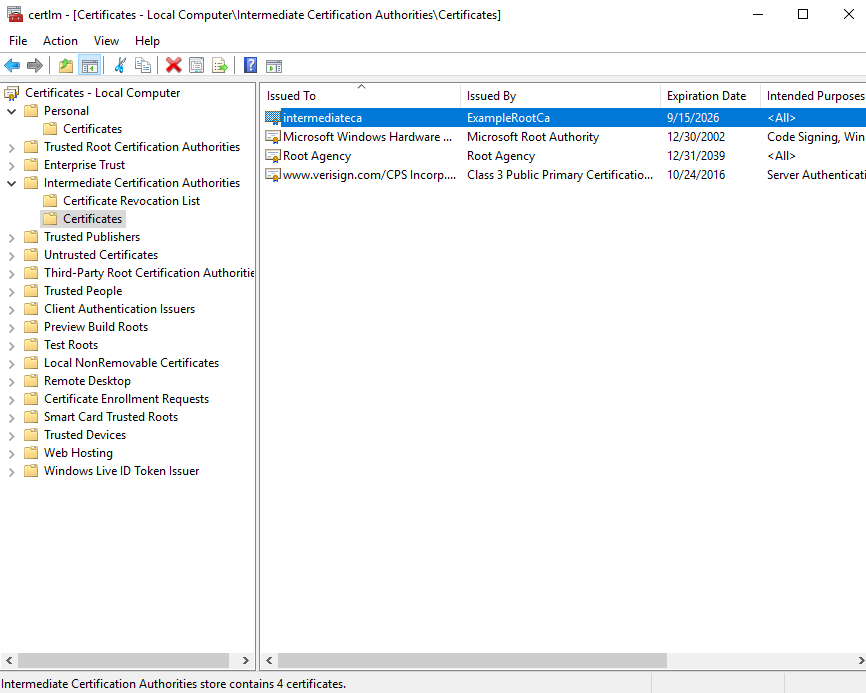
In the Intermediate Certification Authorities / Certificates folder, you will find certificates from the intermediate certification authority that issued the web server certificate and any other intermediate certification authorities (if the intermediate certification authority was in turn issued by an intermediate certification authority).
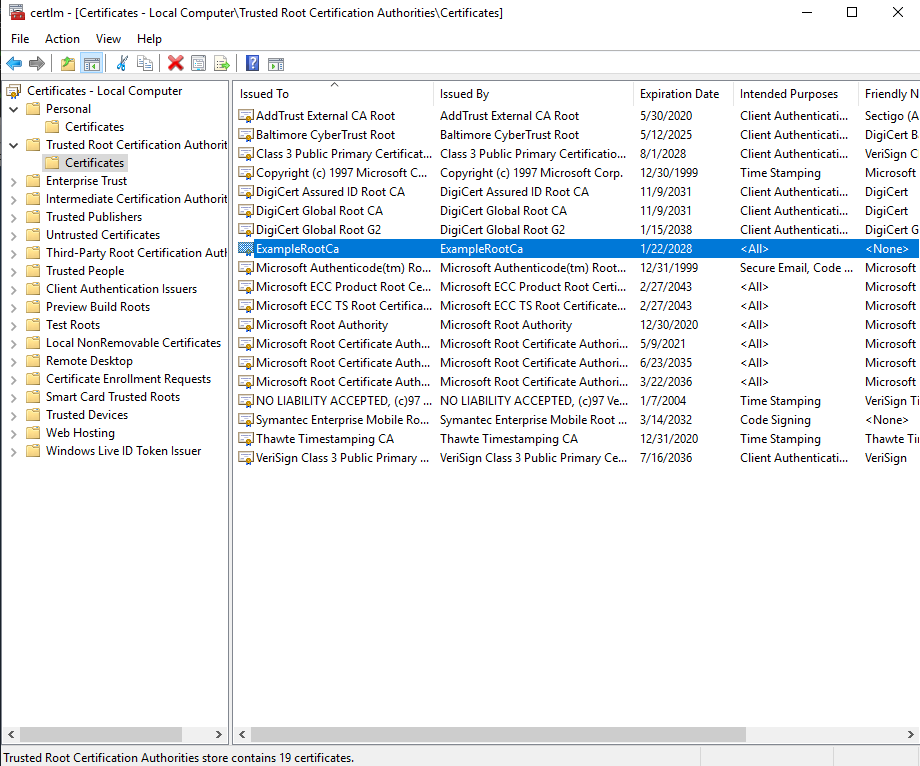
In the Trusted Root Certification Authorities / Certificates folder, you will find the root certification authority of the trust chain.
Once you have imported the certificate chain, you can assign the web server certificate to an IIS site in the Internet Information Services (IIS) Manager using an https binding (see Creating an IIS site).
Notes on setting up SSL web server certificates in third-party reverse proxies
If you want to operate an upstream reverse proxy, you should ensure when configuring the third-party web server that the web server transfers the certificates of the entire chain of trust in the initial TLS handshake. This means that in addition to the web server certificate, all intermediate certification authorities and the root certification authority are included. In IIS under Windows, you can achieve this by importing the entire chain into the Windows certificate store (as specified in the previous section "Import SSL web server certificate"). For other web servers, you may need to append the various certificates to a .pem file.
If you test the URL in a browser after setting it up, it is possible that the browser will successfully perform the TLS handshake even though the web server is configured incorrectly. The most common browsers support optional extensions such as "Authority Information Access". An http URL is embedded in the web server certificate. The browser uses this URL to reload the certification authority if it is not present in the handshake. This extension is not supported by every application (e.g. not by the Mobile App on Android). You should therefore always ensure that the web server transmits the entire chain in the handshake. You can check the certificates exchanged in the handshake with the following OpenSSL command.
# replace localhost:443 with the host you want to testopenssl s_client -showcerts -connect localhost:443 < /dev/null Creation of an application pool
Create a separate application pool for each application. Applications in the same application pool run in the same process and are therefore not properly isolated from each other, e.g. with regard to rights and process crashes.
IIS applications run in an application pool. In simple terms, the application pool defines the properties of the process in which the IIS application is executed. Of particular interest is the user under which the process is executed and via which you can control the rights of the web application, in particular file rights.
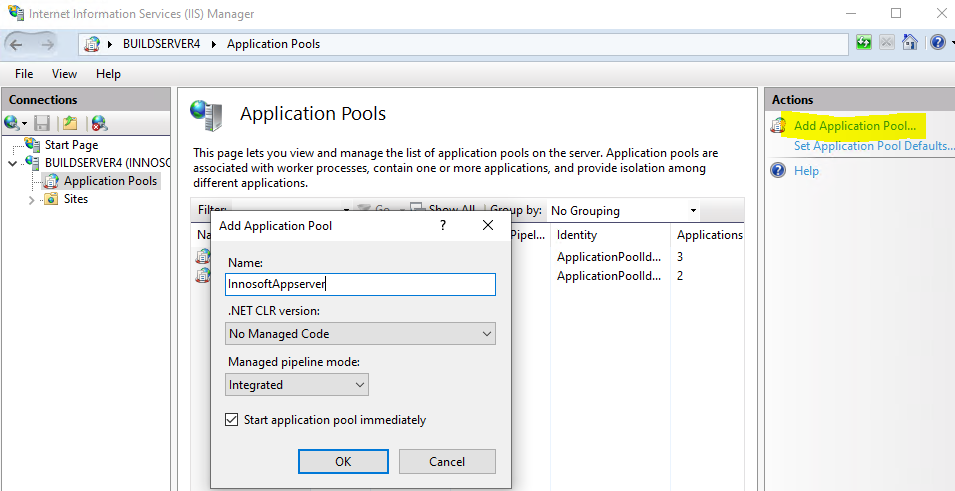
To create a new application pool, click on the Application Pools node in the tree structure within the Internet Information Services (IIS) Manager and on Add Application Pool in the Actions menu on the right-hand side. Create the application pool by entering the following values in the Add Application Pool form and then confirm the data by clicking on the "
OK" button.
Name: Freely selectable (it is best to use the site name & application name separated by a "_", which you have previously assigned in the folder path, e.g. innosoftwebservices_mobile)
.NET CLR version: "No Managed Code" (Technically, the process also works as a .NET Framework (legacy) process, but causes unnecessary overhead).
Managed pipeline mode: "Integrated" (the default value)
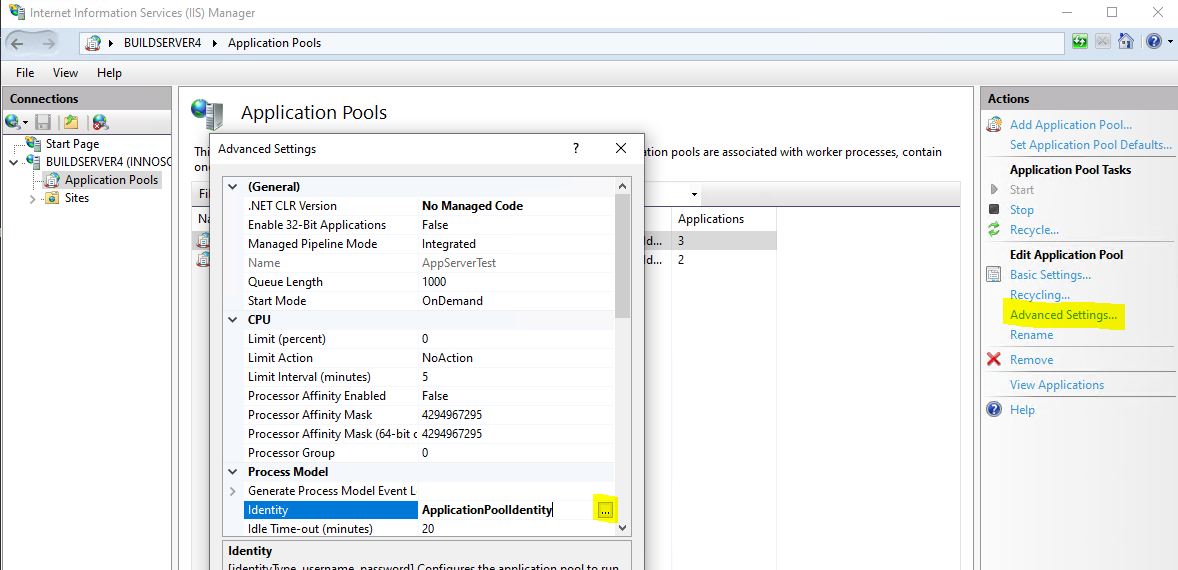
You will find the created application pool in the list of available application pools. By default, the application pool runs under a built-in user (Identity column contains ApplicationPoolIdentity). The user is a member of the local group IIS_IUSRS. In this case, you can set file permissions via this group. We advise against using the built-in default user and recommend using a dedicated service account in the domain to set file permissions for network shares, among other things. To change the user of the application pool, select the corresponding application pool in the list and click on "Advanced Settings..." below Edit Application Pool in the Actions area on the right-hand side. In the Advanced Settings dialog, scroll down to Identity within Process Model. Click on the Identity column so that a "..." button appears on the right-hand side. Click this button to open another dialog in which you can set the user.
Select "Custom account" in the Application Pool Identity dialog and click on the "Set" button. Then enter the user name and password of the service account and close all dialogs using the "Ok" button to accept the changed user.
Creating an IIS site
An IIS site defines the port (and host) via which IIS applications can be reached within an IIS site. In addition, an IIS site consists of a (root) IIS application and optional other IIS (sub) applications. When structuring via sub-applications (recommended), the (root) IIS application remains "unused"/"empty" and you create web applications as IIS (sub) applications within the IIS site. If you want to assign a separate port to each web application (not recommended), the (root) IIS application contains the Innosoft web application.
To create a new site, click on the Sites node in the tree structure within the Internet Information Services (IIS) Manager and on Add Website in the Actions menu on the right-hand side. Complete the subsequent Add Website dialog depending on the desired structure.
Enter the folder name you have assigned for <Site Name> as the Site name. If you have unpacked the application to C:\\inetpub\innosoftwebservices\mobile, enter innosoftwebservices. The name of the site is preset as the Application pool. This application pool should not yet exist and is created together with the site. The application pool is only responsible for the (root) IIS application, which is not used by us and can therefore be left at the default value. Under Physical path, enter the absolute path up to and including the folder named after the site (in the previous example, the path is C:\\inetpub\innosoftwebservices). Under Binding, set the port (depending on http or https) via which the Site can be reached. If you add an https binding, you must select the corresponding SSL certificate. To do this, the SSL certificate must be available in the Windows certificate store Personal or Web Hosting (see "Import SSL web server certificate"). You can subsequently change the binding of a site. If you are undecided, first select http and then add another Binding for
https.
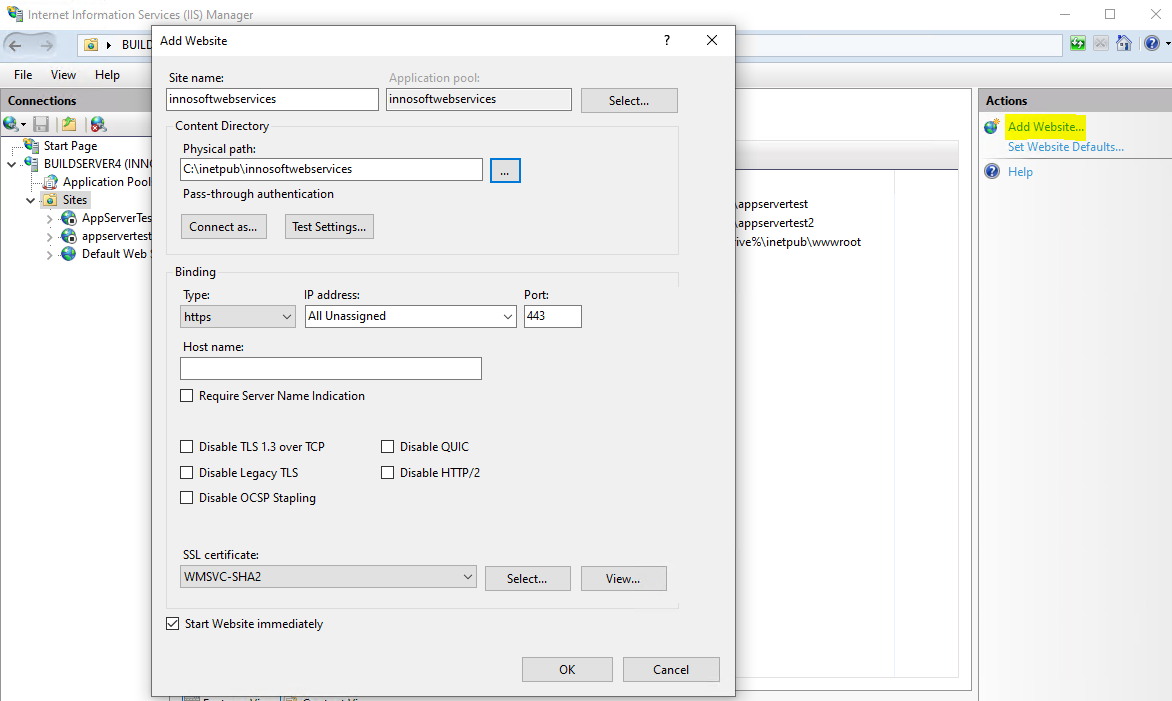
Enter the folder name you have assigned for <Application Name> as the Site name. If you have unpacked the application to C:\\inetpub\innosoftwebservices\mobile, enter mobile. The name of the site is preset as the Application pool. If the name differs from the application pool that you created previously, please select the previously created Application pool using the "Select" button. Under Physical path, enter the absolute path of the folder in which you have unpacked the application (in the previous example, the path is C:\\inetpub\innosoftwebservices\mobile). Under Binding set the port (depending on http or https) via which the Site can be reached. If you add an https binding, you must select the corresponding SSL certificate. To do this, the SSL certificate must be available in the Windows certificate store Personal or Web Hosting (see "Import SSL web server certificate"). You can subsequently change the binding of a site. If you are undecided, first select http and then add another Binding for https.
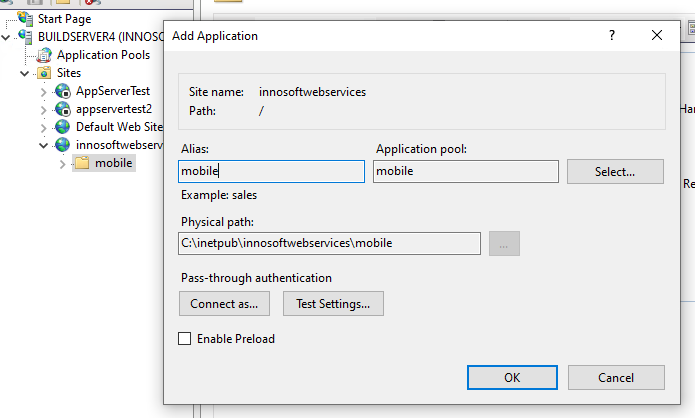
Creation (IIS-Sub)-Application
Skip this section if you have opted for the variant without sub-applications. The (root) IIS application already contains the Innosoft web application.
In the last step, add the Innosoft web application as an IIS (sub) application within the newly created IIS site. To do this, expand the IIS site in the tree structure on the left-hand side. All folders located within the folder of the IIS site are listed below the IIS site. This includes the application folder in which you have unpacked the Innosoft web application. Right-click on the folder in the tree structure and select the "Convert to Application" action in the context menu.
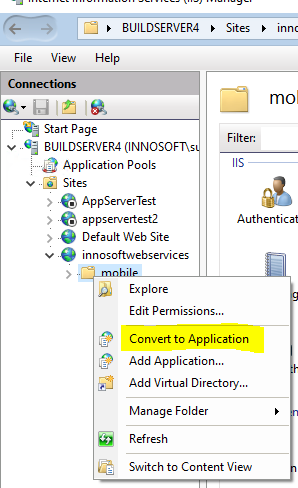
In the subsequent "Add Application" dialog, use the "Select" button to set the "Application pool" to the application pool created in the first step. Then create the IIS (sub)-application using the "OK" button.
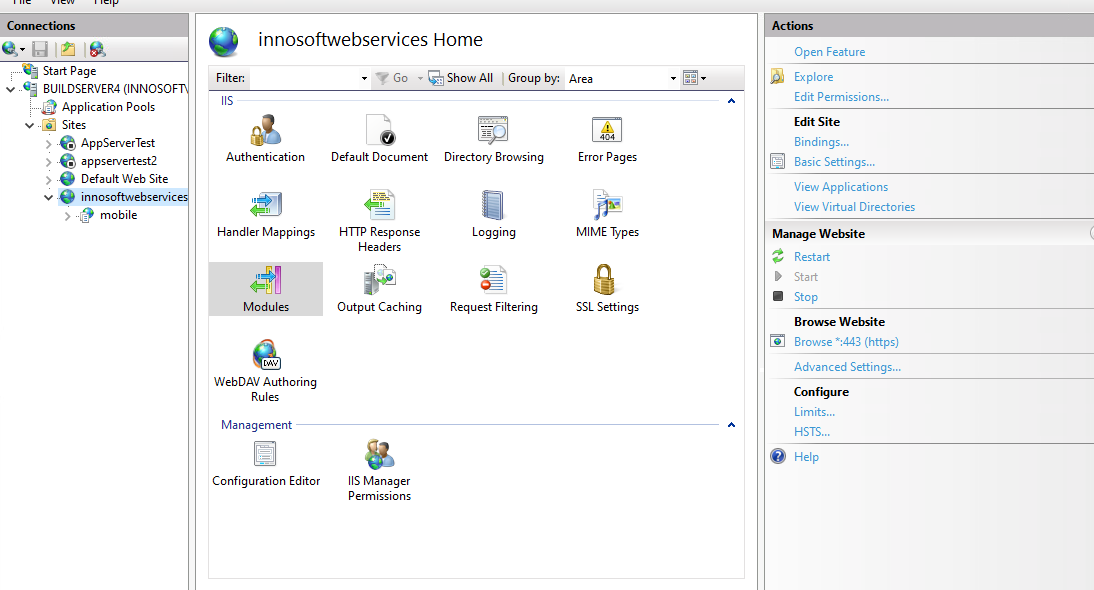
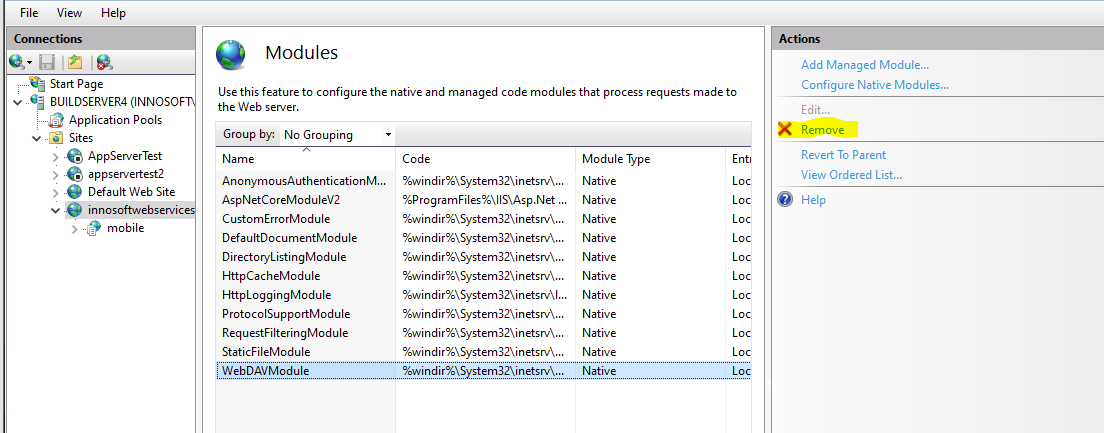
Remove WebDAV IIS module
Microsoft typically pre-installs the WebDAV IIS module. The module intercepts some HTTP requests and hinders the correct use of Innosoft web applications. Make sure that the module is not listed in the module list of the page. To do this, select the previously created IIS site in the tree structure and click on Modules in the middle area. If the list contains the entry "WebDavModule", remove the entry by selecting the entry in the list and clicking on the "Remove" action on the right-hand side. This removes the unnecessary module from the IIS root application and all IIS (sub) applications.
Completion: Set up port sharing and application
So that the web application can also be opened outside the machine, you must allow incoming TCP connections to the port that you have assigned to the IIS site in the firewall rules.
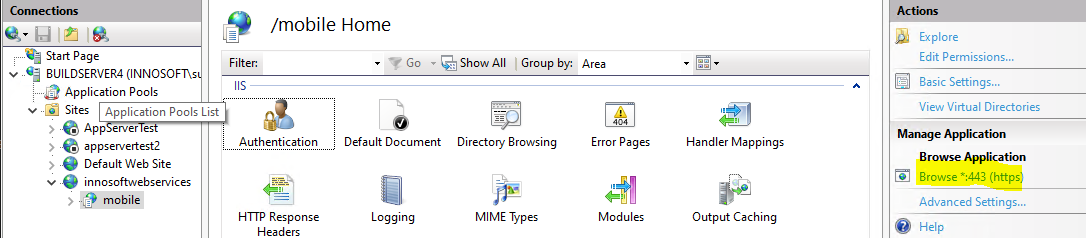
netsh advfirewall firewall add rule name="innosoftwebservices" dir=in action=allow protocol=TCP localport=443 # replace 443 with local port you've set inside the iis-site-bindingYou can open the IIS web application under localhost in the standard browser via the Internet Information Services (IIS) Manager. To do this, select the IIS (sub) application or IIS site (if you have set up the application as an IIS (root) application) in the tree structure and then click on the "Browse *:<Port>" action on the right-hand side below Manage Application / Browse Application.
If Internet Explorer opens, you must copy the URL from the address bar and open it in a modern browser such as Chrome or Edge.
The web application is configured within the browser. To do this, open the web application in a modern browser such as Chrome or Edge (Internet Explorer is not supported). The setup dialog is protected behind a temporary setup login, as the web application is potentially connected to the network. The login data can be found in the file "AppData\System\SetupUser.json" relative to the application directory of the web application (the login name is "setup"). The setup login data is only valid within the setup dialog. As soon as you have completed the setup, the login screen that protects the admin console no longer allows the setup login. Go through the following steps in the setup dialog (further configuration options are available in the admin console after completing the setup):
Specifying a local admin account for the Admin Console
Specifying the database connection
The local admin account then gives you comprehensive access to all configuration pages within the admin console. The admin account is stored in encrypted form in the application directory of the web application and not in the database. This gives you access to the admin console if the configured database is not accessible. You can only use the local admin account to log in to the admin console. Use a long and random password, we recommend using a password generator. You can subsequently change the password of the local admin account in the Admin onsole, but not the user name.
The admin console allows the login of an Innosoft user with system rights (saved in the database). If the local admin account and an Innosoft user have the same user name, you can only log in with the login data of the local admin account. Therefore, do not choose the same user name that you use as an Innosoft user.
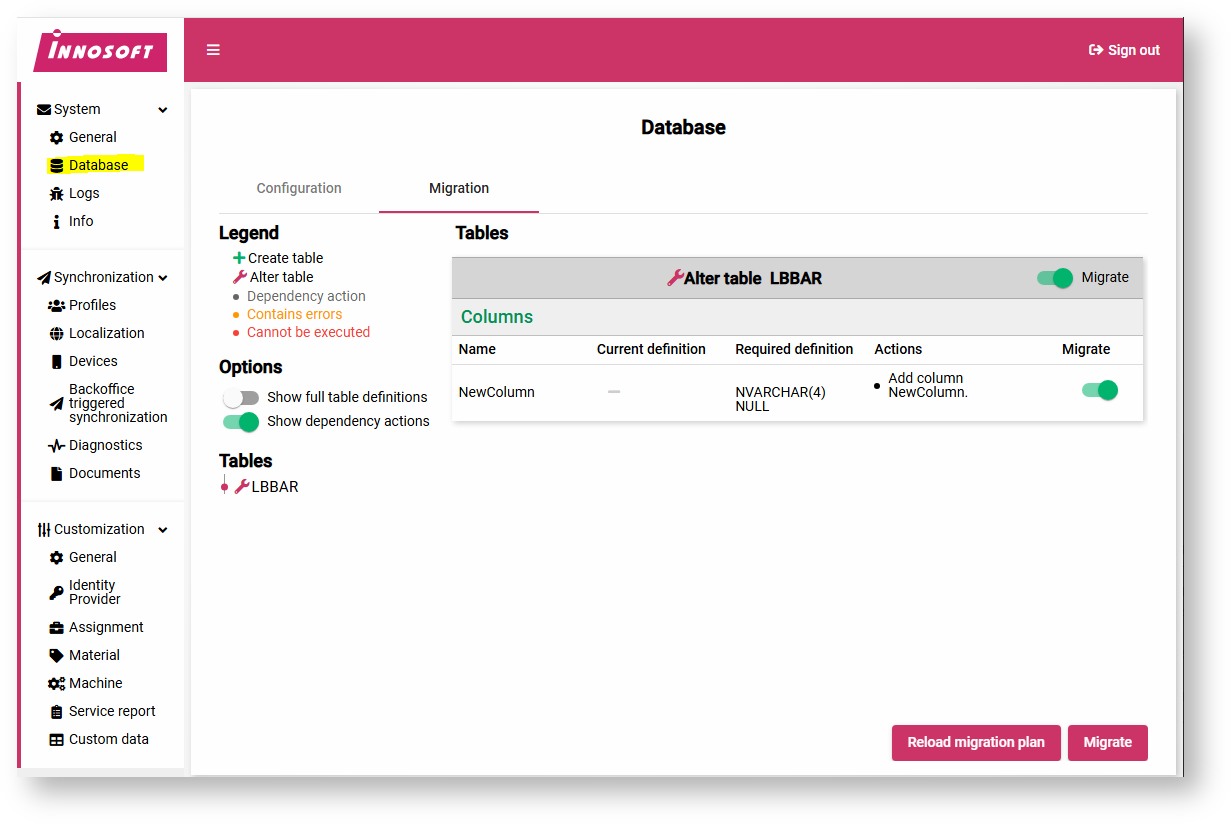
After you have completed the setup dialog, a login screen appears. Log in with the previously defined local admin data to gain access to the admin console. We recommend checking the database schema after installation and after each update and migrating it if necessary. To do this, navigate to the "System / Database" page in the admin console and select the Migration tab. The page evaluates the database schema and displays any necessary schema adjustments. Carry out the suggested schema adjustments by clicking on the "Migrate" button.
Updating a web application
This section describes the steps that you should follow when updating an existing web application. In the subsection "Updating via Powershell" you will find a Powershell script that automates these steps if you do not want to go through the steps manually.
Before updating the web application, check the requirements for the new web application version (in particular the required .NET runtimes) in the same way as for the initial installation. Once you have ensured the prerequisites, carry out the following steps:
Shutting down the IIS application
Updating the application folder
Starting the IIS application
Migrating the database via the admin console
To be able to update the application folder in the following step, you must first shut down the IIS application to be updated so that the files in the application folder are released. To do this, you should not close the IIS Application pool. Instead, create an empty file with the name "app_offline.htm" in the application folder. This will shut down the web application in a controlled manner: Running HTTP requests are given a certain amount of time to run through and incoming HTTP requests are rejected with the status code 502 Service unavailable (TODO timeout).
Then update the application folder with the contents of the zip package of the new web application version. To do this, do not copy the contents of the zip package directly via the application folder. Delete files in the application folder that are no longer required and then unzip the zip package into the application folder (this will also prevent conflicts). To do this, delete all files and folders except for the following folders, which contain application configuration/log files:
AppData/**
logs/**
app_offline.htm (so that the IIS application is not started during the copying process)
After you have copied all files, delete the app_offline.htm file. The next HTTP request to the URL of the web application starts the IIS web application. Open the admin console of the web application in a modern browser such as Chrome or Edge (Internet Explorer is not supported). In the login screen, log in with the data of the local admin account. Then navigate to the database migration in the admin console and make the necessary schema adjustments. Execute the database migration first before opening other pages in the admin console and making configurations, as these could access database tables that have not yet been migrated. The update is completed.
Updating via Powershell
The following Powershell script asks the user for the .zip file containing the new web server application and for the application folder to be updated. The script then checks the installed .NET runtimes and issues an error if the required .NET runtimes are not installed. The IIS application is then shut down via "app_offline.htm". The script deletes files that are no longer required from the application folder before copying the application files from the zip file to the application folder. The user must then open the admin console and perform a database migration.