Standard Import of Master Data
Using the standard import feature, you can import master data from Excel spreadsheets. In version 2.4, you can initially import only addresses and contacts.
Requirements
Only users with system permission level = 2 have access to the standard import.
Notes/Warnings
We recommend that you do not use the standard import feature on running systems.
Please do not use the same user account across different browsers or tabs. Only one file per user and import type is stored on the server.
Requirements for Excel files
Currently, only .xlsx files are allowed.
Only the first sheet will be processed.
In each filled column, the row containing the column name must be filled in (row 7 if using a template, row 1 if not using a template).
With templates
Starting with version 2.5, there is a new version of the import templates. These list all the properties that can be imported for each import type.
Columns containing unnecessary properties can be removed entirely. However, no empty columns should remain.
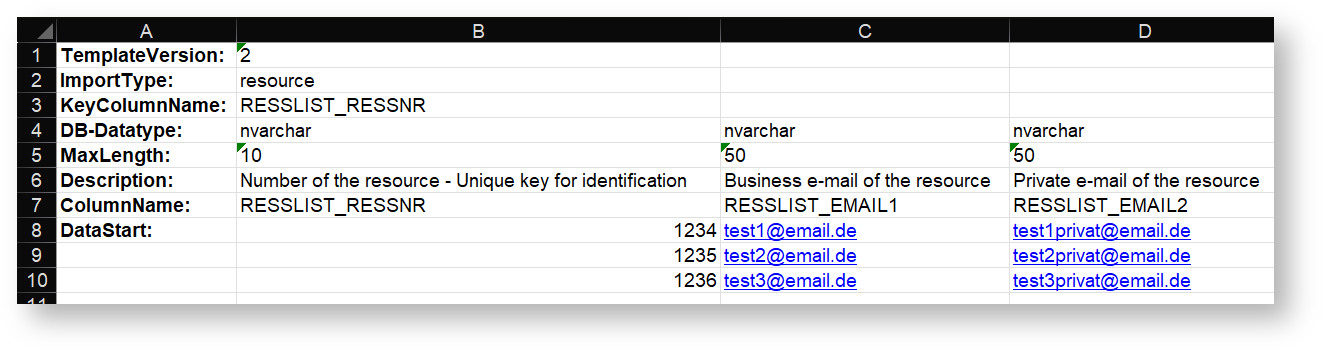
Line 1 is used to identify the template version.
Lines 2–6 display additional information:
ImportType: Import type of the template
KeyColumnName: Primary key of the entity
DB-Datatype: Data type of the database field
MaxLength: Maximum number of characters for text fields
Description: English description of the property
Line 7 specifies the name of the property. This will be displayed later when mapping the database fields. If you use the property names from the template, they will be automatically mapped later.
Starting with line 8, you can enter the data to be imported.
Without templates
If you are not using an import template, please note the following:
The first row must contain the descriptions or names of the properties. These must be unique.
Each subsequent row corresponds to a data record.
The primary key for the data must be in the first column (in version 2.4 and later, starting with version 2.5, you can choose your own unique key).
Accepted formats for date values
Date values and date-time values must be specified in ISO 8601 format.
Note on lookup tables
When importing properties that reference lookup tables, those tables must be filled in first.
Note on addresses
Only one actual address is imported per line. Multiple addresses (mailing, shipping, and billing addresses) must be split into separate addresses and thus separate lines.
Note for contact persons
Contacts need to be assigned an address, so addresses must be imported before contacts.
Note on articles
For articles, there are two properties related to article numbers. The ARTNR property is only important for the technical processing of the records.
Procedure
You can access the standard import via the navigation bar: Under Settings, in the  section, via the sub-item
  .
.
Select import type
First, use an action to select the type of objects you want to import. Currently, the options are  and
and  (and, starting with version 2.5, additionally:
  ,
,  and
and  ). After clicking the corresponding action, a new sheet opens.
Select a file
When you open the sheet, a dialog box appears for uploading the file to be imported. Select the desired file and then confirm by clicking the  button.
If you close this dialog box, you can reopen it using the  action.
Select a key
Starting with version 2.5, you can select a key for the imported dataset that uniquely identifies the records. All imported properties are listed in a dropdown menu.
You must select a property and then confirm your selection by clicking the button.
Mappings
To import the data, the properties of the imported data must be mapped to the properties in the database.
Load mappings
Select whether you want to create new mappings or load existing ones. When you load them, the saved mappings will be applied to imported properties with the same names.
Assign manually
The grid consists of 4 columns:
Imported property = Name of the property from the imported Excel file
Status = Indicates whether a property has been assigned. Green checkmark = Manually assigned, Blue checkmark = Automatically assigned, Red X = Not assigned
Don´t overwrite = If this checkbox is selected, this property will not be overwritten if existing data has the same primary key. Clicking the checkbox in the first row selects or deselects all checkboxes.
Property in the database = The corresponding property from the database can be selected here.
If available, the description from IS_TABELLENFELDER or PLTRANSLATE is displayed, along with TABELLENNAME.TABELLENFELD
2 additional options:
Don´t import - The imported property is ignored during import and when saving the mappings.
Create new individual field - See below.
Create individual fields
If you cannot find a suitable property in the database, you can create your own field by selecting "Create new individual field". This will open a sheet that is already filled.
The data type is set to nvarchar(max) by default, but you can change everything except the table name. However, the column name should retain the prefix (e.g., VKIND_) to ensure the field functions correctly in the app.
After saving, the individual field is created and assigned to the selected location.
Save mappings
To import data, you must first save the mappings. To do this, select the action  . You will then need to enter a name. If old mappings were previously loaded, the old name will be pre-filled. If the selected name already exists and you confirm the warning, the mappings with that name will be overwritten.
Validate data
Before importing, you must verify that the data matches the corresponding database fields. To do this, you must use the  action. If the validation process does not detect any errors, you can confirm the import.
Correct incorrect data
If errors are found during validation, all records containing errors will be displayed. Fields with errors are highlighted in red. If you hover the mouse pointer over the highlighted errors, the reason for the error will be displayed in a tooltip.
You can correct the data directly in the grid. Once the data has been changed, the highlight changes from red to green. This makes it easier for you to see which errors you have already fixed.
After making the corrections, you can start a new validation by selecting the appropriate action.
Depending on the validation result, either a grid for error correction will open again, or the import must still be confirmed.
Confirm import
Once all data has been successfully validated, the import process can begin. Since an import could overwrite a lot of data, you will be asked to confirm this step.
To do so, you must type the displayed word into the text field and confirm it. Depending on the size of the import, the process may take a few minutes.
Logs
Every import operation is logged. You can view past imports by going to Settings in the
section under  .
.