Push Notifications Sender Service: deployment / configuration
The Push Notifications Sender Service is a supplementary application for the Innosoft Mobile App. This service is required to notify Mobile App devices about relevant changes made in back office (which in turn triggers a background synchronization). When you don't configure the Mobile App to use the automatic background synchronization, you don't need this service. The service will scan the configured database for changes periodically and notify the devices of the corresponding technicians. For this the service sends (Firebase) push notifications to the devices. The push notifications don't contain sensitive data like the actual change. A notification only triggers the Mobile App to execute a synchronization using the normal communication channel. So you don't need to worry about privacy, your data won't be transmitted to Firebase (Google, Apple).
Network prerequisites
Access to the database
Outbound tcp connection over port 443 to host fcm.googleapis.com and oauth2.googleapis.com (https requests against firebase web api and oauth api for service authentication)
0. Request the required configuration files from Innosoft's administration
You need to request a set of three configuration files from Innosoft's administration. You can use the configuration files for different environments. The configuration is assigned to an Innosoft customer. The configuration contains data that is required to connect to the Firebase cloud infrastructure that delivers the push notifications to the mobile devices. You need the following configuration files:
google-service.json: configuration for Mobile App on Android. Used by the Mobile App (Android) to setup and register for push notifications
GoogleService-Info.plist: configuration for Mobile App on iOS. Used by the Mobile App (iOS) to setup and register for push notifications
serviceaccountcredential.json: configuration for Push Notifications Sender Service. This service uses this configuration to connect to the Firebase cloud infrastructure in order to send push notifications
1. Apply the configuration files to your system via Management & Synchronization-Server web ui
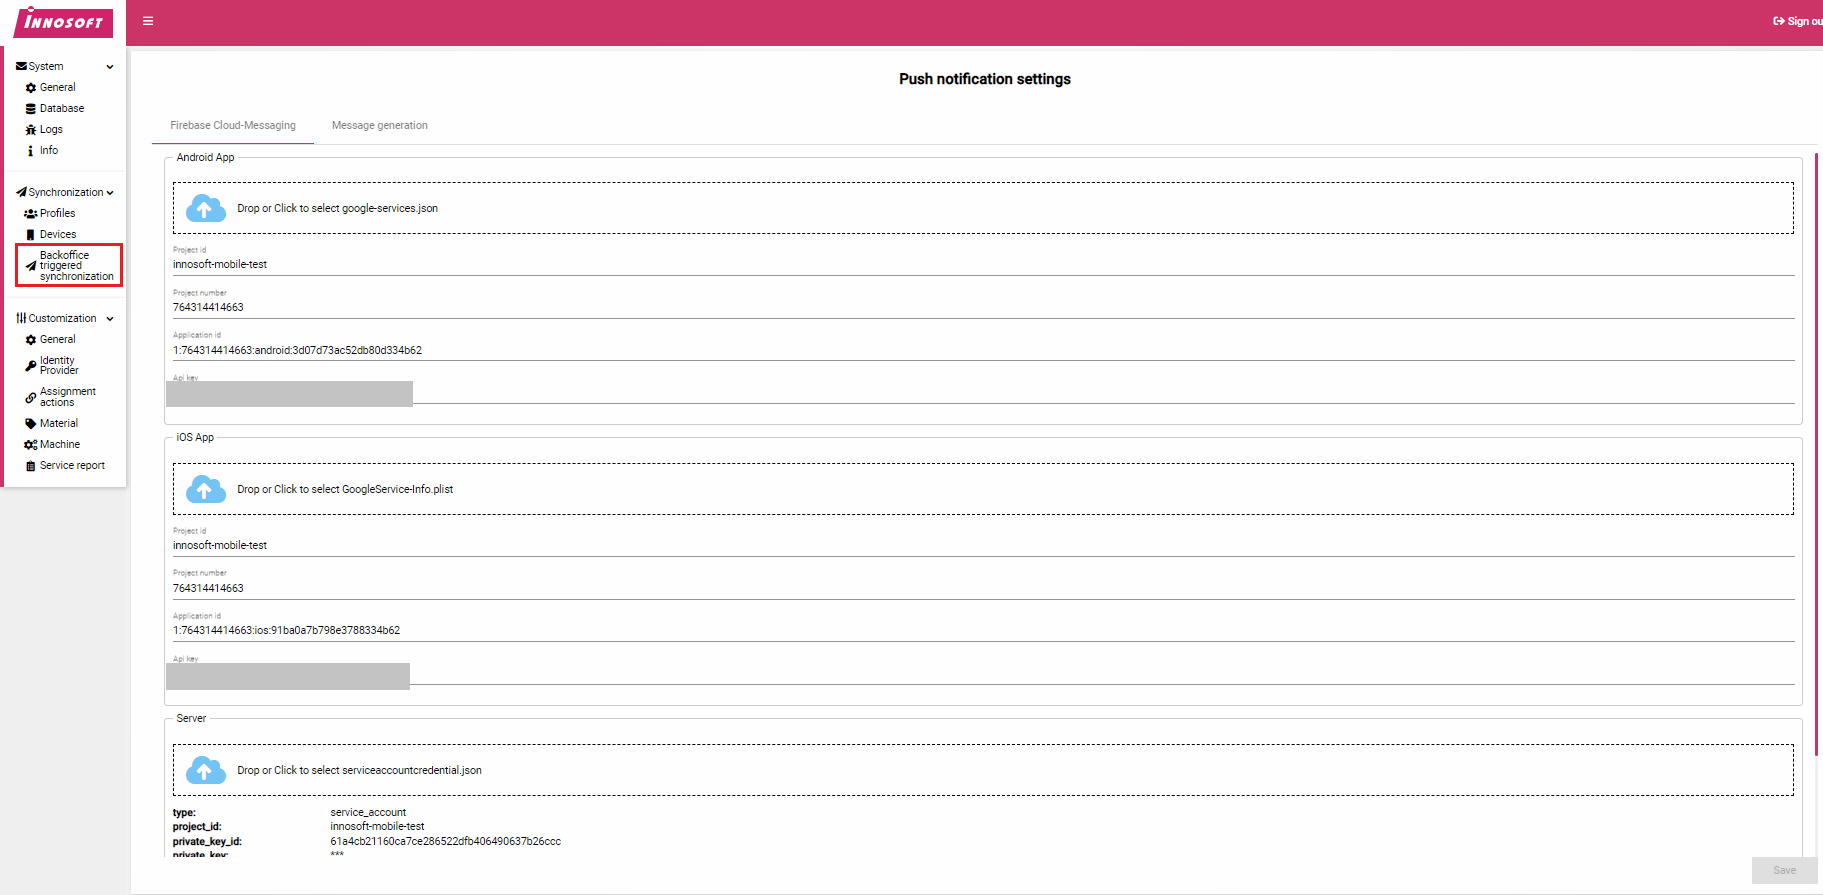
Open the administrative web ui. Navigate to "Synchronization/Backoffice triggered synchronization". When this menu entry is missing, ensure you have installed the version 2.4 or newer (the version is shown in the footer). The tab "Firebase Cloud-Messaging" consists of three configuration sections. Drop the configuration file on the corresponding configuration section to import the configuration values:
Android App: import the configuration values from google-service.json
iOS App: import the configuration values from GoogleService-Info.plist
Server: import the configuration values from serviceaccountcredential.json
After all three sections contain the configuration values, save the configuration to your database by clicking the "Save" button.
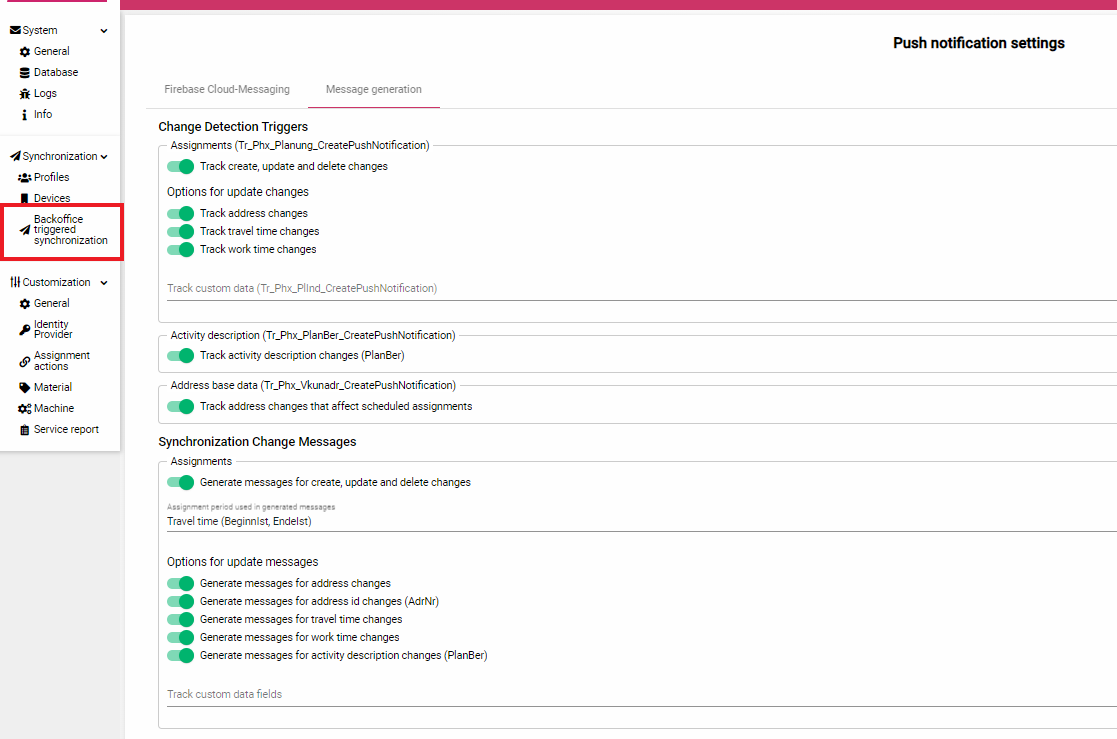
Open the "Message generation" tab and ensure all boxes for "Change Detection Triggers" and "Synchronization Change Messages" are checked. We recommend to start with everything enabled (but custom data PLIND fields). You can adjust the settings later, e.q. disabling the tracking of specific updates and add PLIND custom data fields. After checking all boxes click the "Save" button to save your configuration changes.
"Change Dectection Triggers" control what changes should get propagated to mobile devices to trigger a background synchronization. Such changes reset the assignment Mobile App send status (inside the FSM assignment page "Transmission status") as well. Synchronization Change Messages control what change messages will be prompted to the user, like "you have assigned a new assignment...". Synchronization Change Messages can be used without the automatic background synchronization (change messages will be generated for synchronizations started by the user as well) but typically you want the generated messages to match the tracked changes in "Change Dectection Triggers".
2. Unpack the service zip file to the desired folder and modify configuration
After you've unpacked the zip file you'll notice following files:
appsettings.json: configuration file
Phoenix.PushNotificationDispatcher.WindowsWorker.exe: the executable
install_as_service.ps1: powershell script for the registering the executable as a windows server (see step 3)
Open the configuration file appsettings.json and enter the sql connection string under the path "ConnectionStrings.Db". For this you can copy the connection string from the Synchronization-Server web ui page "System/Database". You'll find the connection string at the bottom of the configuration tab just above the "Test Connection" action. Click "Connection-String show" and copy the connection string. You need to replace the placeholder '***' by the correct password when you don't use the integrated windows authentication.
We recommend that you keep the defaults for the other configuration properties. After you've saved the configuration file the executable is ready to be registered as a windows service.
Launch the executable as normal console application to check if the configuration is correct and the executable runs correctly before you register it as a windows service. The application must get launched from the containing folder (the working directory needs to be containing folder). The application will print information to console.
3. Register the executable as windows service and launch the registered service
The unzipped folder contains the powershell script "install_as_service.ps1" that uses the Service Control Manager (sc.exe) to register the executable as a windows service. By default the windows service runs as "LocalSystem". You can change this by modifying the script and setting the $userAccount and $password variables accordingly.
powershell -executionpolicy bypass -file install_as_service.ps1When you don't want to execute the script and register the windows service manually, please read the sc.exe invocation in the powershell script carefully. The binary path contains arguments that need to be passed to the executable when started as a service.
Activation inside the Mobile App
Once you have completed step 1 and saved the configuration files, the app will request user permission to activate the push notification triggered synchronization. When the user denies the request the automatic synchronization can be activated inside the app setting page . After activation the app will upload a token that was generated by Firebase. This token is used to deliver notifications to the technician's device. You can check if the activation process has completed by opening the "Devices" page inside the administrative web ui. The device table contains a column named Firebase that in turn contains a "show"-label. When the activation process has completed successfully and the Mobile App has uploaded the token, you can click the label that will show the utc timestamp of the upload event and the corresponding token.